Stuffolio User's Manual
Your Personal Product Manager for iOS, iPadOS, and macOS
Version 3.4 | May 2026 — synced with Stuffolio Build 35
Press / to search, Esc to close
Introduction
Stuffolio is a comprehensive product management app that helps you track everything you own. This manual provides step-by-step instructions for using every feature.
Supported Platforms
| Platform | Minimum Version |
|---|---|
| iPhone | iOS 17.0+ |
| iPad | iPadOS 17.0+ |
| Mac | macOS 14.0+ |
Pricing at a Glance
Stuffolio is free to download; the four AI features come with a free count-based allowance at install (no time limit), then a small free amount every month, with an optional $3.99/month or $19.99/year subscription for unlimited use. See Pricing, AI Allowance, and Subscription for the full breakdown.
Navigation Overview
iPhone Use the tab bar at the bottom of the screen with five tabs: Dashboard, My Items, Tools, Stuff Scout, Settings. Access Legacy Wishes and Insights from the More menu.
iPad/Mac Use the sidebar on the left side of the screen. Tap the sidebar icon to show or hide the sidebar. Sections include: Dashboard, My Items, Tools, Insights, Stuff Scout, Legacy Wishes, Settings. Build 35 refreshed the sidebar palette to use the section colors (Dashboard blue, My Items purple, Tools/Actions teal, Insights pink, Stuff Scout orange, Settings gray) at the chrome opacity that holds up under colorblind-accessible contrast checks; Stuff Scout's sidebar hierarchy was also reorganized so the most-used scan options surface first.
Back to ContentsPricing, AI Allowance, and Subscription
Stuffolio is free to download. That covers inventory, warranties, Decision Memory, repair-keep-replace decisions, donation tracking, Legacy Wishes, Household sharing, exports, iCloud sync, and the rest of the lifecycle product. The base app does not require a subscription, ever.
Stuffolio's four AI features call paid AI services per use, so they have a separate optional subscription: $3.99/month or $19.99/year. The subscription exists so the people who use AI cover the cost, and so the people who never touch it never pay for it.
Your Free Allowance at Install
When you install Stuffolio, you get a free allowance for each of the four AI features. There's no time limit and no clock — the free amount is a count, not a countdown, so it's yours to use whenever you like:
- Stuff Scout: 5 free items
- AI Product Assistant: 10 free searches
- Receipt & Label Scans (OCR): 5 free scans
- Repair-Keep-Replace alternatives: 5 free looks
The four counters are independent, not pooled. Running out of Stuff Scout items doesn't touch your AI Assistant searches, and so on. Pace yourself however suits you — install today, use one item, come back three weeks later, and the rest of your allowance is still waiting.
After Your Allowance Is Used Up
If you don't subscribe, each AI feature keeps a small free amount every calendar month, refilling on the 1st (these don't stack — each month starts fresh):
- Stuff Scout: 1 free item / month
- AI Product Assistant: 2 free searches / month
- Receipt & Label Scans (OCR): 1 free scan / month
- Repair-Keep-Replace alternatives: 1 free look / month
A feature only moves to its monthly amount after its starting allowance is fully used — features you've barely touched keep their original allowance.
If you subscribe, all four AI features run with unlimited use within fair-use bounds. The bounds are designed to be far above any normal usage pattern, so most subscribers will never see them. The qualifier exists so the cap that does exist (for runaway or commercial-scale use) doesn't surprise anyone.
Seeing Your Quota
Your remaining quota is visible from the moment you start using AI, not just at exhaustion:
- On each AI feature's entry point — a small "X of N remaining" indicator (or a "Subscribe" cue once that feature is used up for the month).
- In Settings → Subscription Status — all four counters listed separately, plus the next monthly refill date.
- On the AI Product Assistant view — a session counter alongside the remaining-searches counter, so you can see how fast a single research session is burning your quota.
If You Run Out
When a feature's quota hits zero, Stuffolio names what you used (e.g., "You've used your 5 free Stuff Scout items"), names the price, and names the next free affordance (the monthly refill date for that feature). The choice is yours: subscribe, wait for next month's free amount, or keep using the rest of the app.
Back to ContentsTools Overview
The Tools section organizes utilities into six categories to help you find what you need quickly.
Tool Categories
| Category | Description | Tools |
|---|---|---|
| Capture | Scan and import products | Smart Scanner, CSV Import |
| Export | Export and share reports | Inventory Report (PDF, CSV, Excel) |
| Decisions | Valuation and planning | Stuff Scout, Price Watch, Keep, Donate, Sell Advisor |
| Data | Backup and restore | Backup Data, Restore Data |
| Safety | Recalls and product help | Recall Checker, AI Assistant |
| Maintenance | Clean up and organize | Verify Inventory, Photo Optimizer, Duplicate Finder, Clean Up Records, Bulk Price Update, Batch Categorize |
Getting Started
First Launch
When you open Stuffolio for the first time:
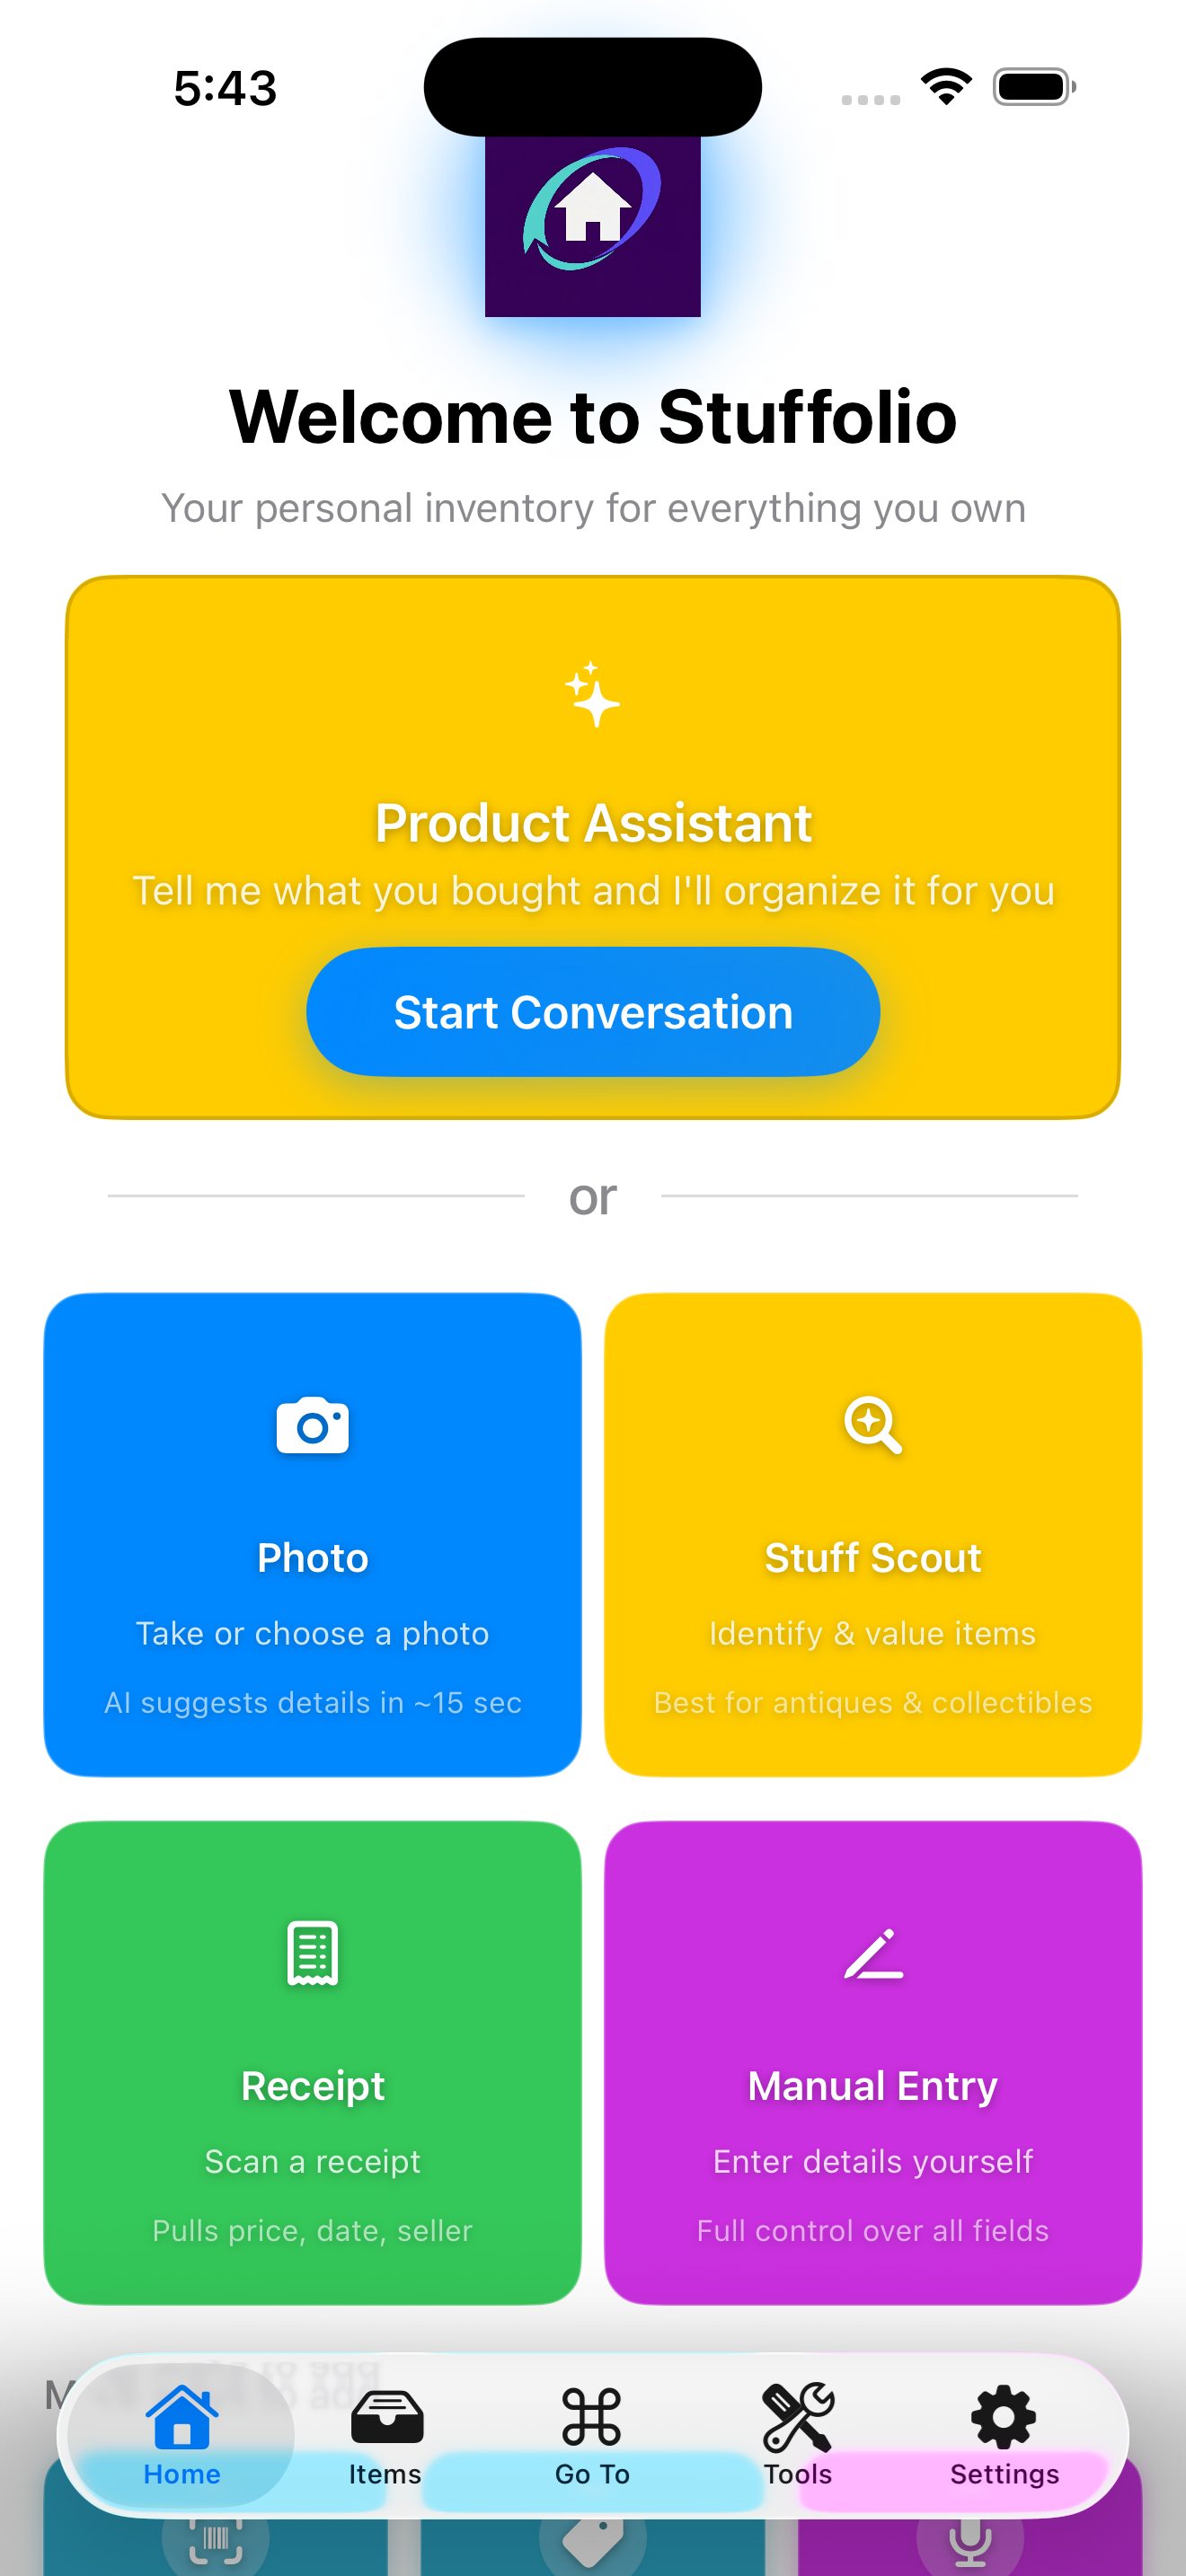
- Welcome Screen appears. Before you have any items, the home screen embeds the Add Item chooser inline so you can start adding right away — no extra navigation.
- Swipe through any introduction screens or tap Skip
- Accessibility Options screen appears:
- Review available accessibility features
- Tap Continue
- Permissions screen appears:
- Tap Allow Camera if you want to scan barcodes, photograph items, and capture receipts
- Tap Allow Notifications if you want warranty and maintenance reminders
- You can skip these and enable them later in Settings
- Tap Get Started to enter the app. The first thing you'll see is the inline Add Item chooser on your home screen until you've added your first item.
When you first use Voice entry, you'll be asked for microphone access. You can grant or deny it then; it's not part of the first-launch flow.
Understanding the Home Tab (iPhone)
The Home tab on iPhone is organized around Three Phases — the lifecycle of your stuff. The right tool is in reach at the right moment, and nothing else gets in the way.
🛒 Acquire
Everything you reach for when something new enters your life. Fast paths, front and center:
- Add Item — Opens the chooser. Seven entry methods (Photo, Stuff Scout, Receipt, Manual Entry, Barcode, Label, Voice) plus Paste/Drop accelerator
- Stuff Scout — AI identification for antiques, collectibles, thrift finds, and anything else you're not sure about
- Scan Barcode — Direct shortcut to UPC lookup for retail products
🛠️ Maintain
What you own day-to-day. This phase surfaces only what needs attention — not a wall of inventory:
- Warranty status cards for items with coverage expiring soon
- Overdue and upcoming maintenance tasks
- Recall alerts pulled from CPSC and manufacturer feeds
- Price Watch notifications when a replacement cost shifts significantly
- Borrowed & Lent entry point — see what you've lent out or borrowed, and who has what
📤 Move On
When it's time to sell, donate, archive, or pass something along:
- Legacy Wishes — Assign items to people in your life
- Donation Tracking — Record donations with fair market value for tax records
- Repair, Keep, or Replace — Decision support from the AI Assistant when something breaks
- Disposal — Mark items as sold, donated, gifted, or discarded, with a reason trail
Understanding the Dashboard (iPad & Mac)
On iPad and Mac, the Dashboard replaces the Home tab as the primary landing surface. Here's what each section shows:
Quick Stats Bar (at the top)
- Swipe left/right to see: Total Items, Purchase Cost, Current Value, Fun Fact
- Tap the chevron to collapse this section
Needs Attention
- Items with warranties expiring in 30 days
- Overdue maintenance tasks
- Items on loan that are due back
- Items missing important information
Recently Added
- Your most recently added items
- Tap any item to view its details
Feature Cards
Quick access to: Stuff Scout, Smart Scanner, AI Assistant, Recall Check, Reports, Value Calculator
Back to ContentsAdding Your First Item
Opening the Add Items Menu
iPhone
- Tap the My Items tab at the bottom
- Tap the blue + button in the bottom-right corner
- The Add Items chooser appears
iPad/Mac
- Click My Items in the sidebar
- Click the + button in the toolbar (top of screen)
- The Add Items chooser appears
Choose How to Add
The Add Item chooser offers seven entry methods, organized into two tiers plus an always-visible accelerator strip. Pick any of them — they all route into the same form, and you can switch methods mid-entry.
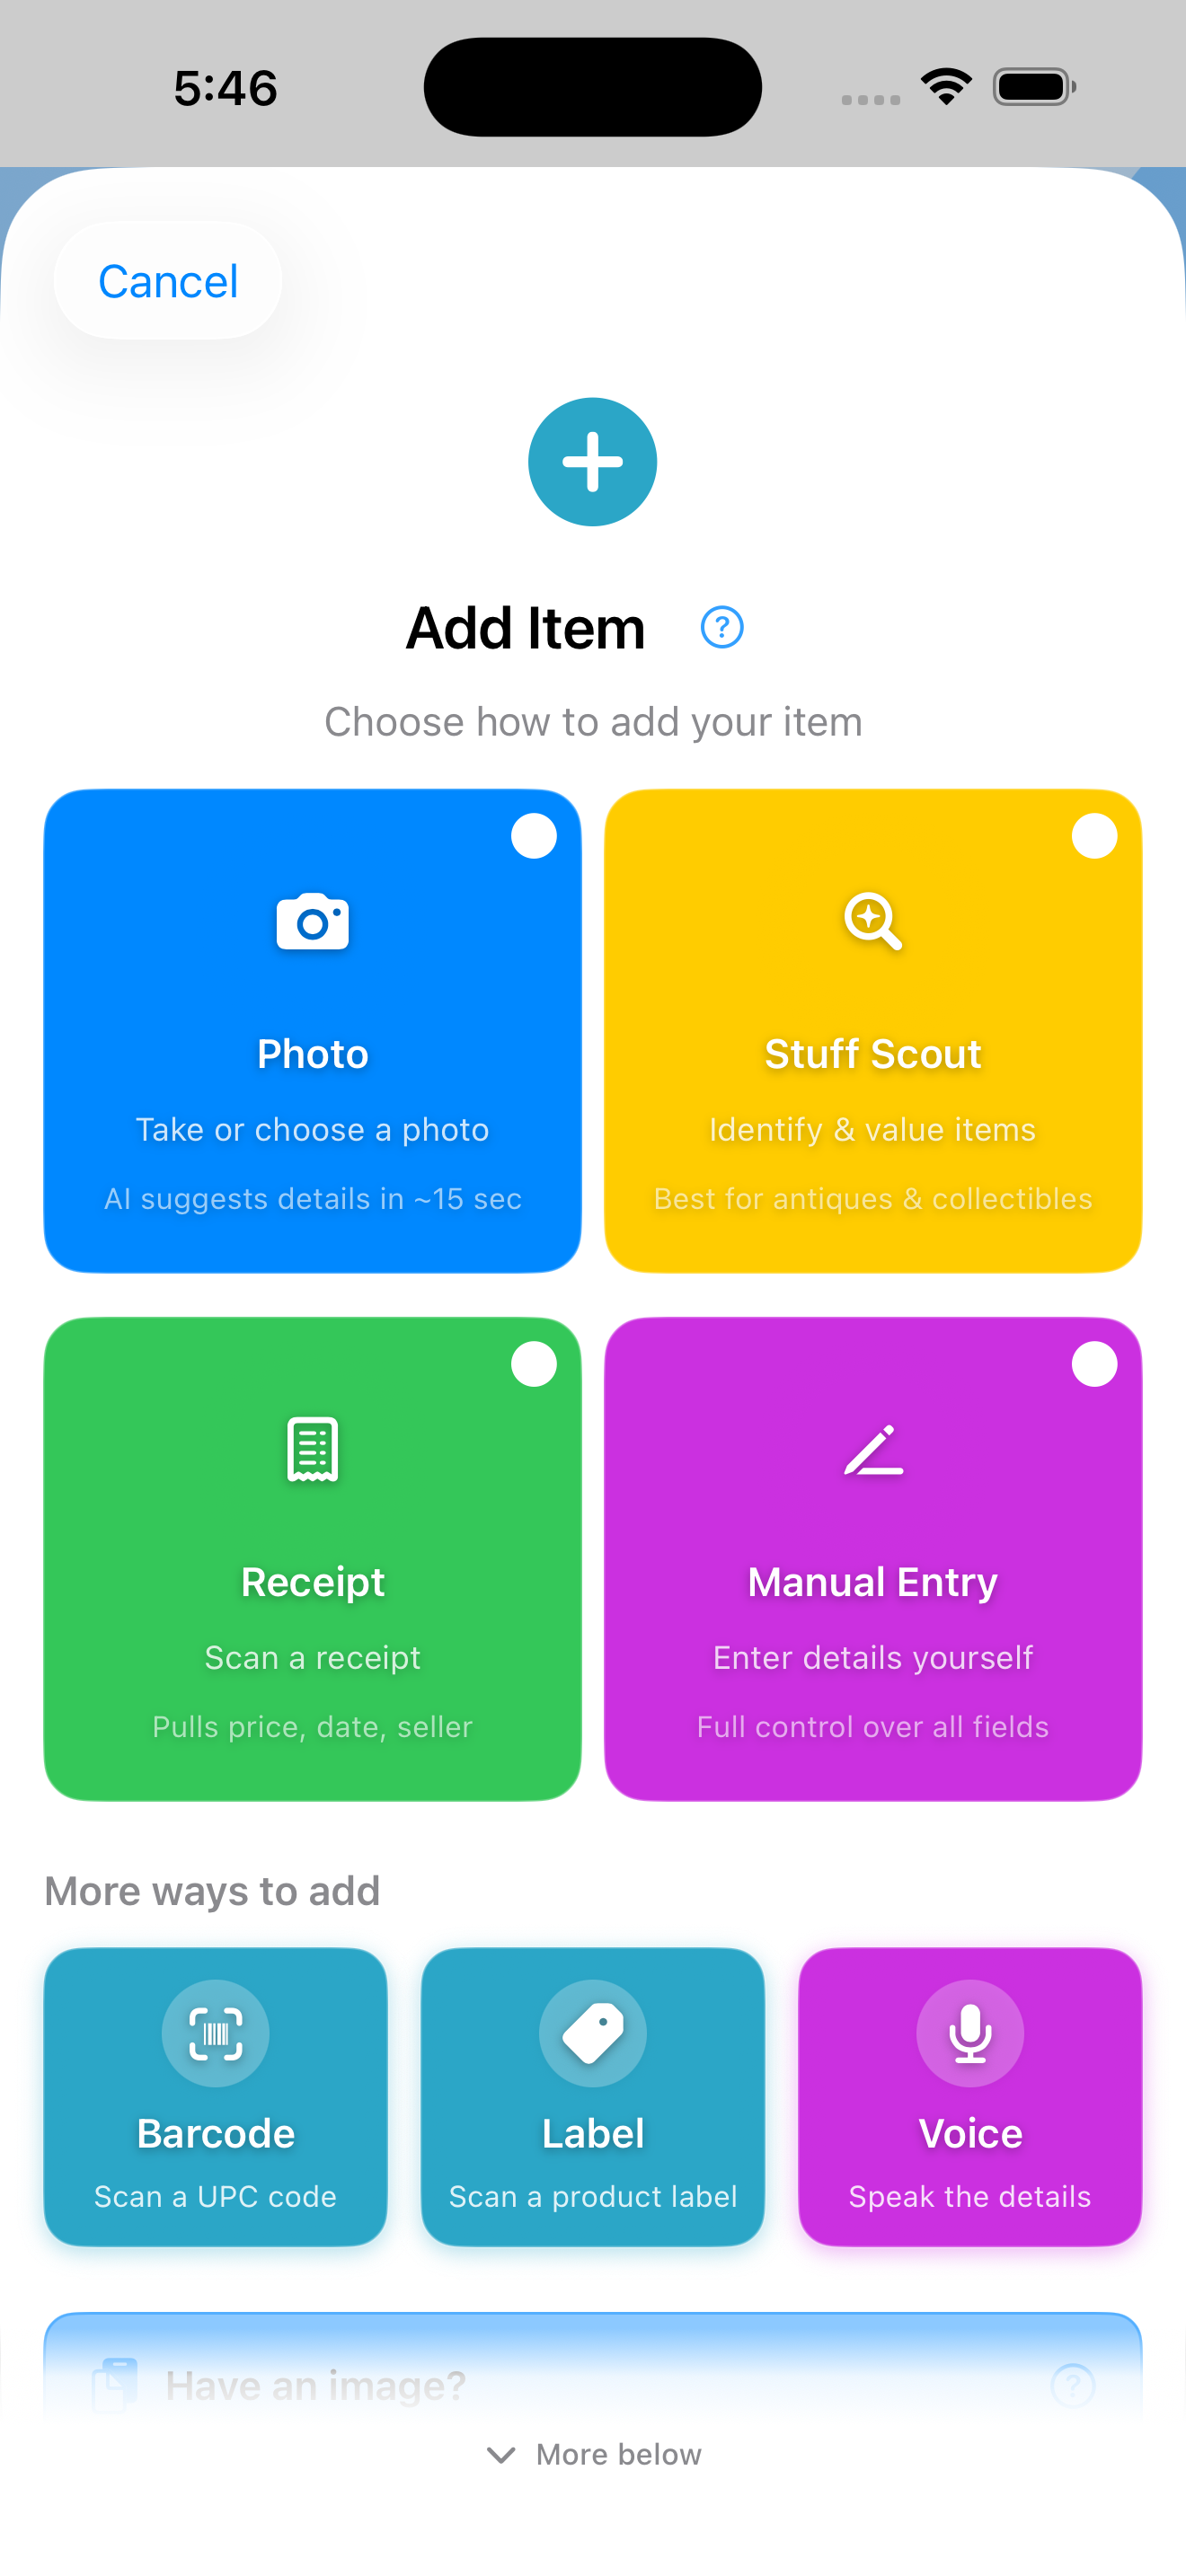
Primary tier
The four tiles you see first:
- 📷 Photo — Take or choose a photo. For subscribers, AI automatically identifies your item, estimates its value, and fills in details while you watch the form appear instantly.
- 🔍 Stuff Scout — Full AI analysis: identification, pricing, history, and comparable listings. Best for collectibles, thrift finds, and anything you can't identify yourself.
- 🧾 Receipt — Photograph a receipt. OCR extracts the store name, purchase date, and price into the form before you start typing.
- ✏️ Manual Entry — Enter all details yourself. Best when you know exactly what information you want to record.
More ways to add
Three additional entries below the primary tier:
- 📱 Barcode — Scan a UPC barcode for quick product lookup. Great for items with visible barcodes on packaging.
- 🏷️ Label — Photograph a nameplate or label. OCR extracts brand, model number, and serial number. Especially useful for appliances and electronics.
- 🎤 Voice — Speak the item details. Say "Add coffee maker to kitchen, manufacturer Cuisinart, price 99 dollars" and Voice parses title, room, brand, price, model, and serial. Hands-free from the chooser, or from the mic button next to Product Name in any form.
Paste & Drop accelerator
Always visible at the bottom of the chooser. Skip the picker when you already have an image:
- 📋 Paste image — Tap to paste an image from your clipboard. Works on iPhone, iPad, and Mac. When the clipboard is empty, the button stays visible but disabled so you know the option exists.
- 🖱️ Drop image — Drag an image from Photos, Files, or another app into the drop zone. iOS (iPhone and iPad) for now; not yet supported on Mac.
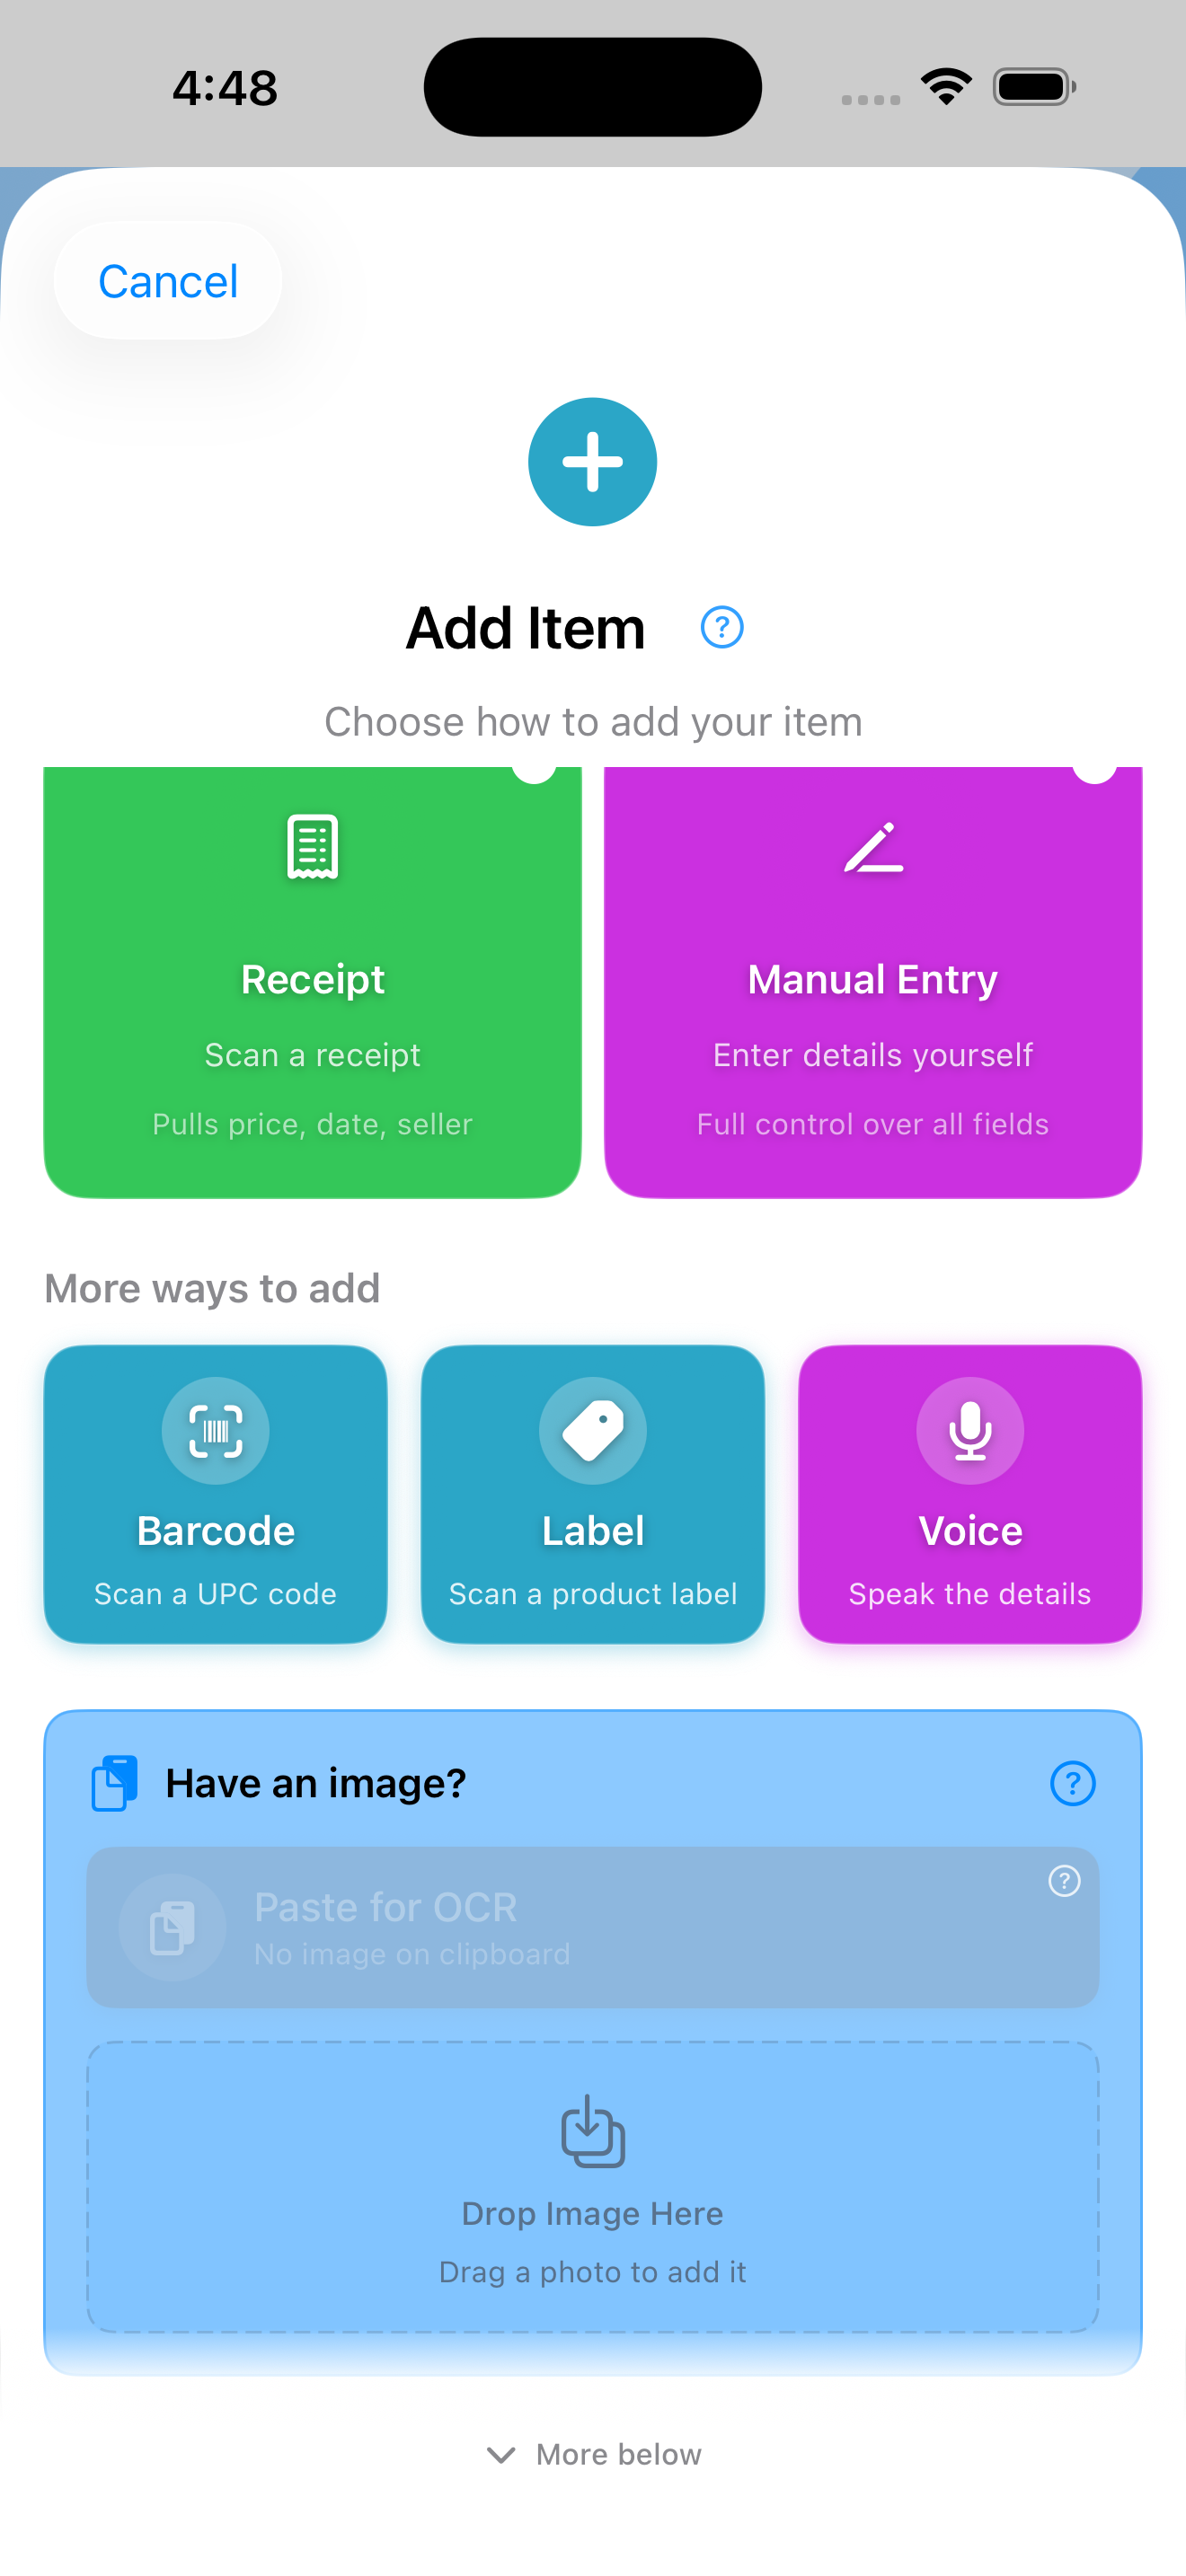
💡 Tip: On iPhone, the chooser scrolls. If you see a "⌄ More below" hint at the bottom of the visible area, swipe up to reveal the Paste/Drop accelerator strip.
💡 Tip: To record a donation for tax purposes, first add the item using any method above, then go to Dispose Of → Donate to mark it as donated and record the recipient organization.
Method 1: Photo (Recommended)
The fastest way to add items. Capture one or more photos, then the form appears while AI analyzes in the background.
- Tap Photo in the chooser
- Choose how to add your first photo:
- Take Photo — Use your camera to capture the item
- Choose from Library — Select an existing photo
- Paste from Clipboard — Use a copied image
- Import from Files — Select an image file
- After your first photo, you enter photo collection mode:
- A thumbnail strip shows your selected photos with a counter (e.g., "1 of 5 photos")
- Button labels update to guide you: "Capture another angle", "Add more from library"
- You can add up to 5 photos — more angles improve AI accuracy
- Tap the × on any thumbnail to remove it
- When ready, tap Continue with AI Analysis
- The form appears immediately with your photos attached
- For subscribers: AI analyzes in the background. Fields fill in automatically as results arrive:
- Product title and manufacturer
- Estimated value
- Additional details like era and origin
- You can start editing other fields while AI works — no waiting required.
💡 Tip: Adding 2-3 photos from different angles significantly improves AI identification accuracy. Include a close-up of any labels, nameplates, or maker's marks.
Method 2: Stuff Scout
Full AI analysis with pricing and history. Covered in detail in the Stuff Scout section below.
Method 3: Receipt
Snap a receipt and let OCR fill in the store, date, and price before you type anything.
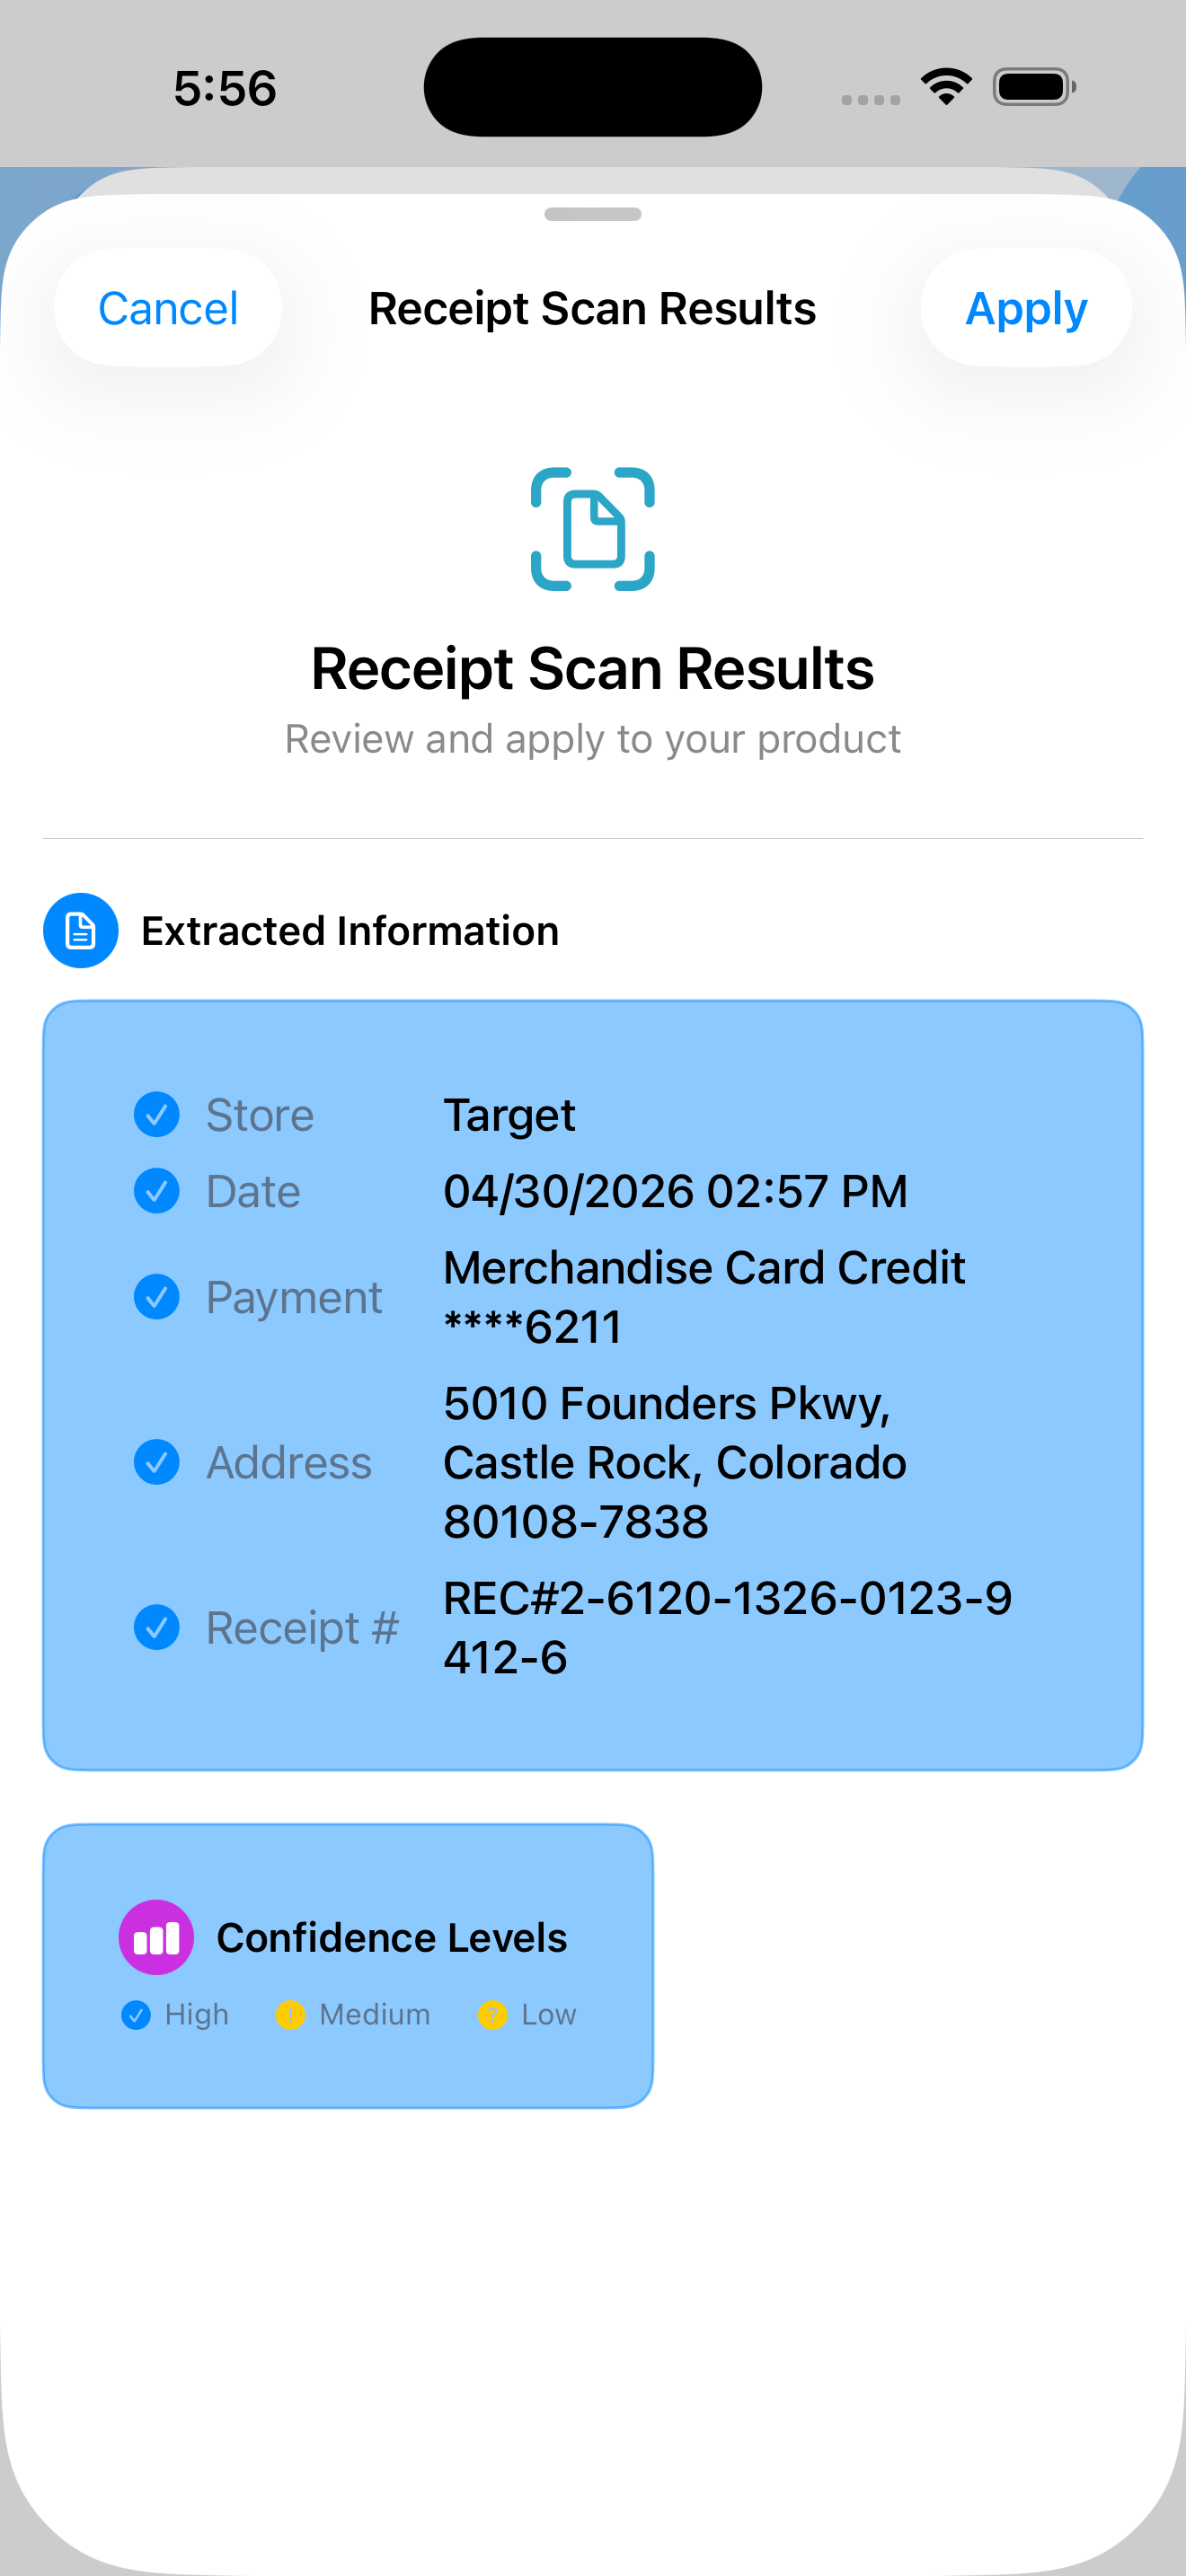
- Tap Receipt in the chooser
- Photograph the receipt. Make sure the store name, date, and total are visible and in focus.
- OCR extracts:
- Store name — pre-fills the Retailer field
- Purchase date — pre-fills the Purchase Date field
- Price — pre-fills the Purchase Price field
- The Add Item form appears with those fields already filled in
- Add the Product Name and any other details you want, then Save
💡 Tip: Already have a receipt photo attached to an existing item? Use Auto-fill from Receipt in the form to extract details from photos you've already added.
Method 4: Manual Entry
Full control over all fields. Use this when you already know everything and just want to record it.
- Tap Manual Entry in the chooser
- The Add Item form opens with no fields pre-filled
- Fill in the details (see "Filling Out the Product Form" below)
Method 5: Barcode
Quick lookup for products with visible UPC codes.
- Tap Barcode in the "More ways to add" tier
- Point your camera at the barcode
- Product information fills in automatically from global databases
- Review and save
Method 6: Label
Photograph a nameplate to extract brand, model number, and serial number without typing.
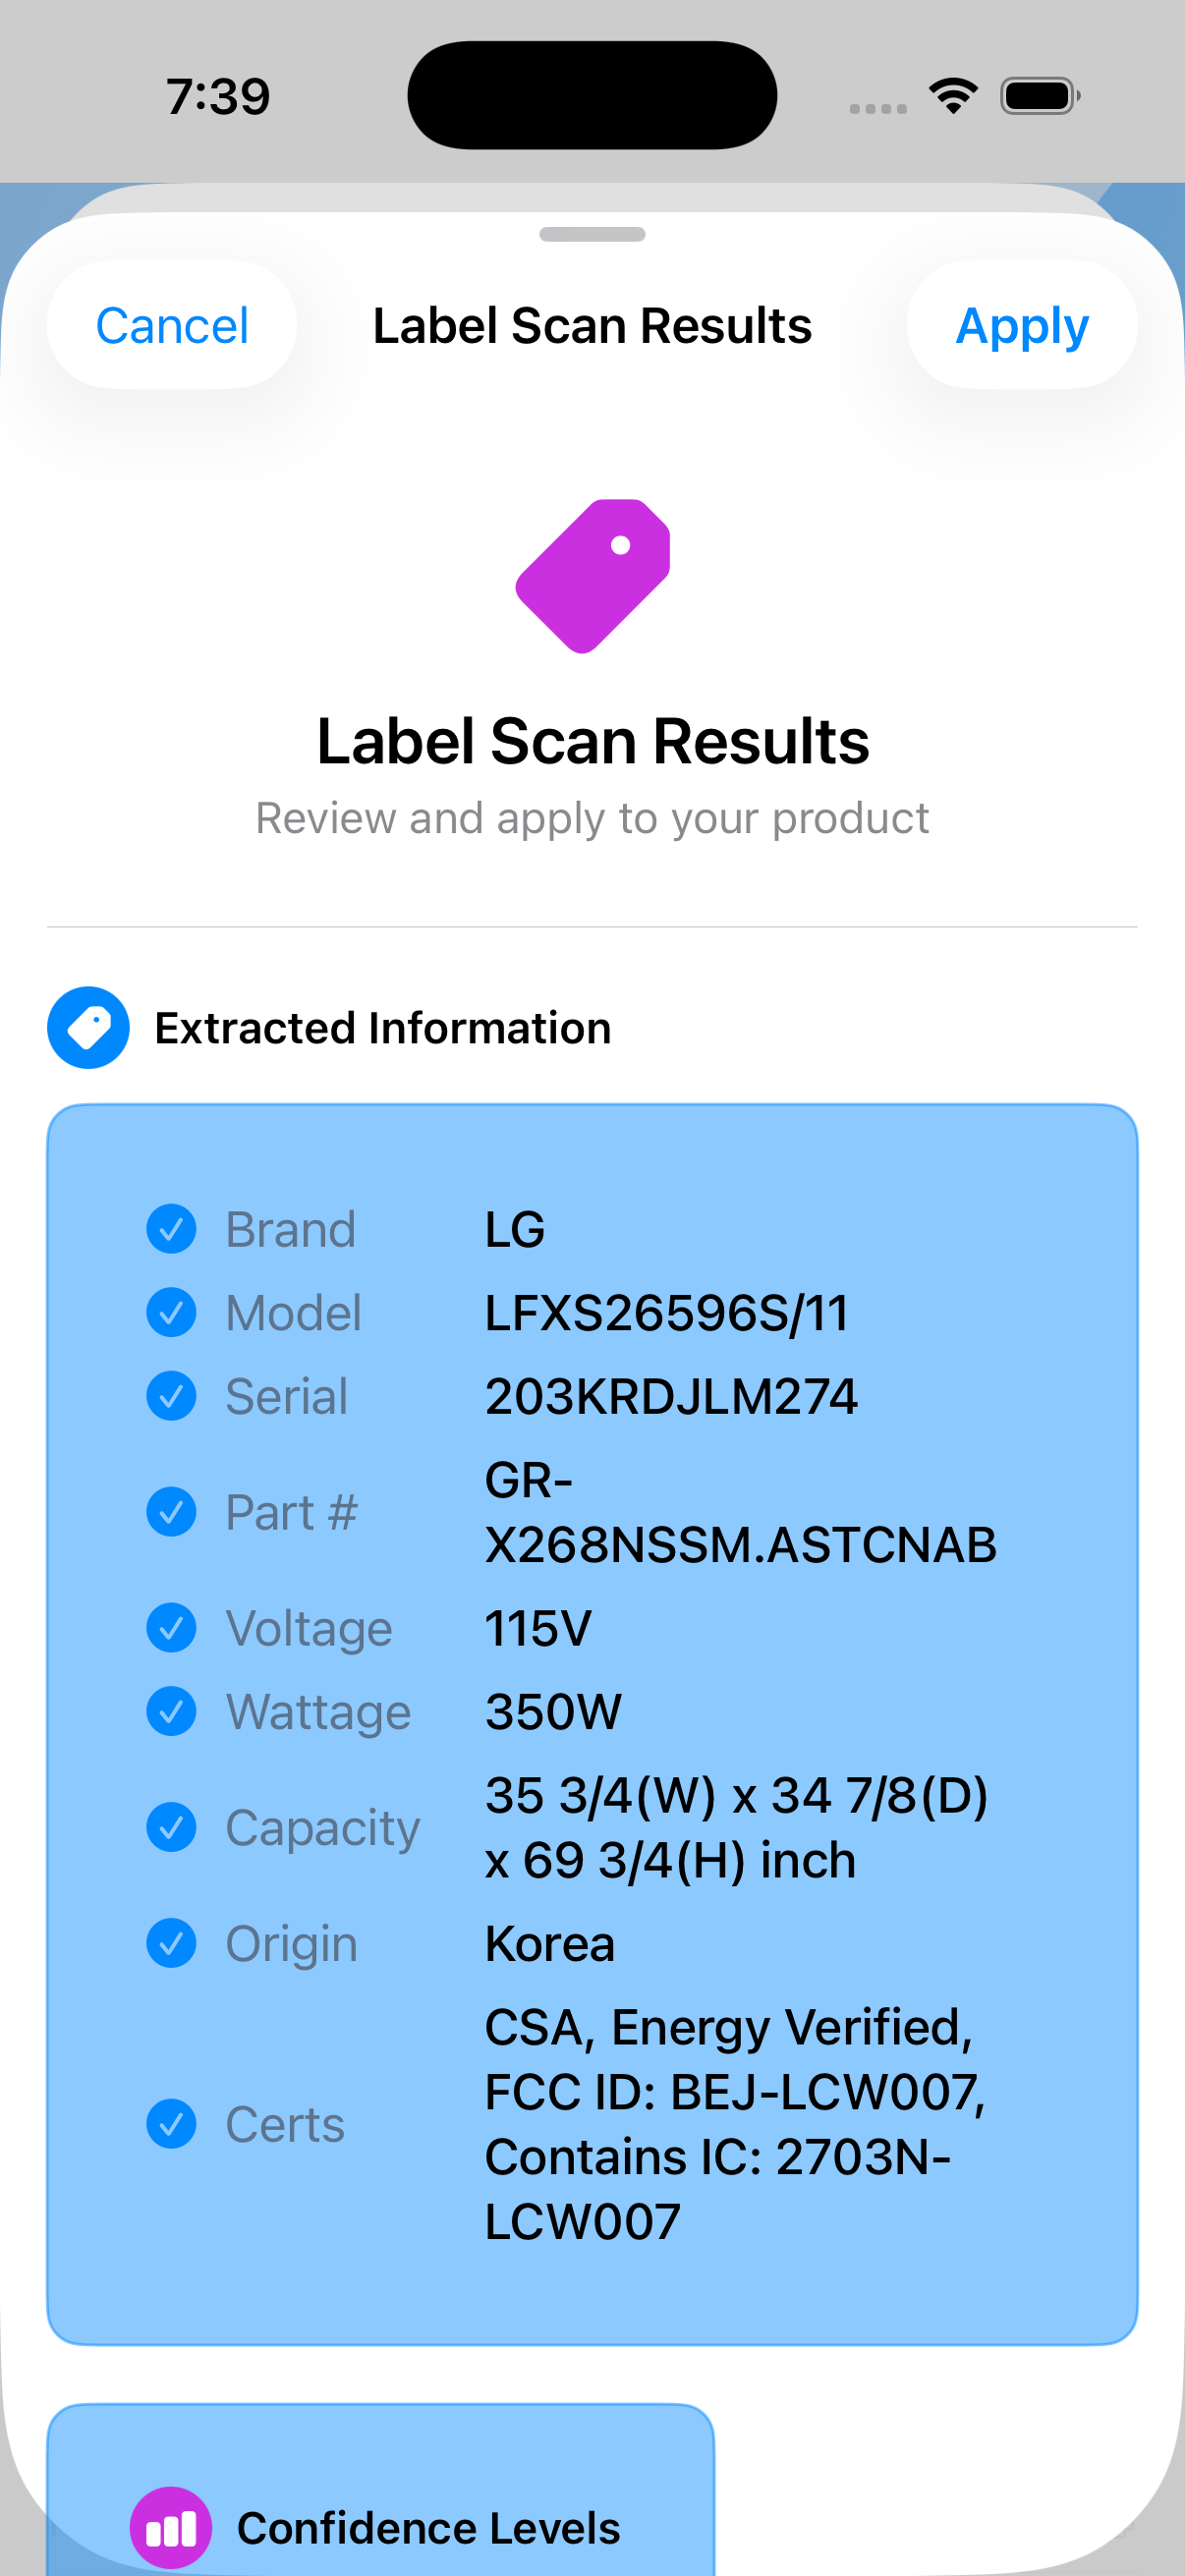
- Tap Label in the "More ways to add" tier
- Photograph the product's nameplate, model sticker, or maker's mark
- OCR extracts brand, model number, and serial number (where visible) into the form
- Add any remaining details and save
💡 Tip: Label scanning is most useful for appliances and electronics where the model and serial number are the hardest parts to type accurately.
Method 7: Voice
Hands-free entry. Speak the item details and Stuffolio parses them into form fields.
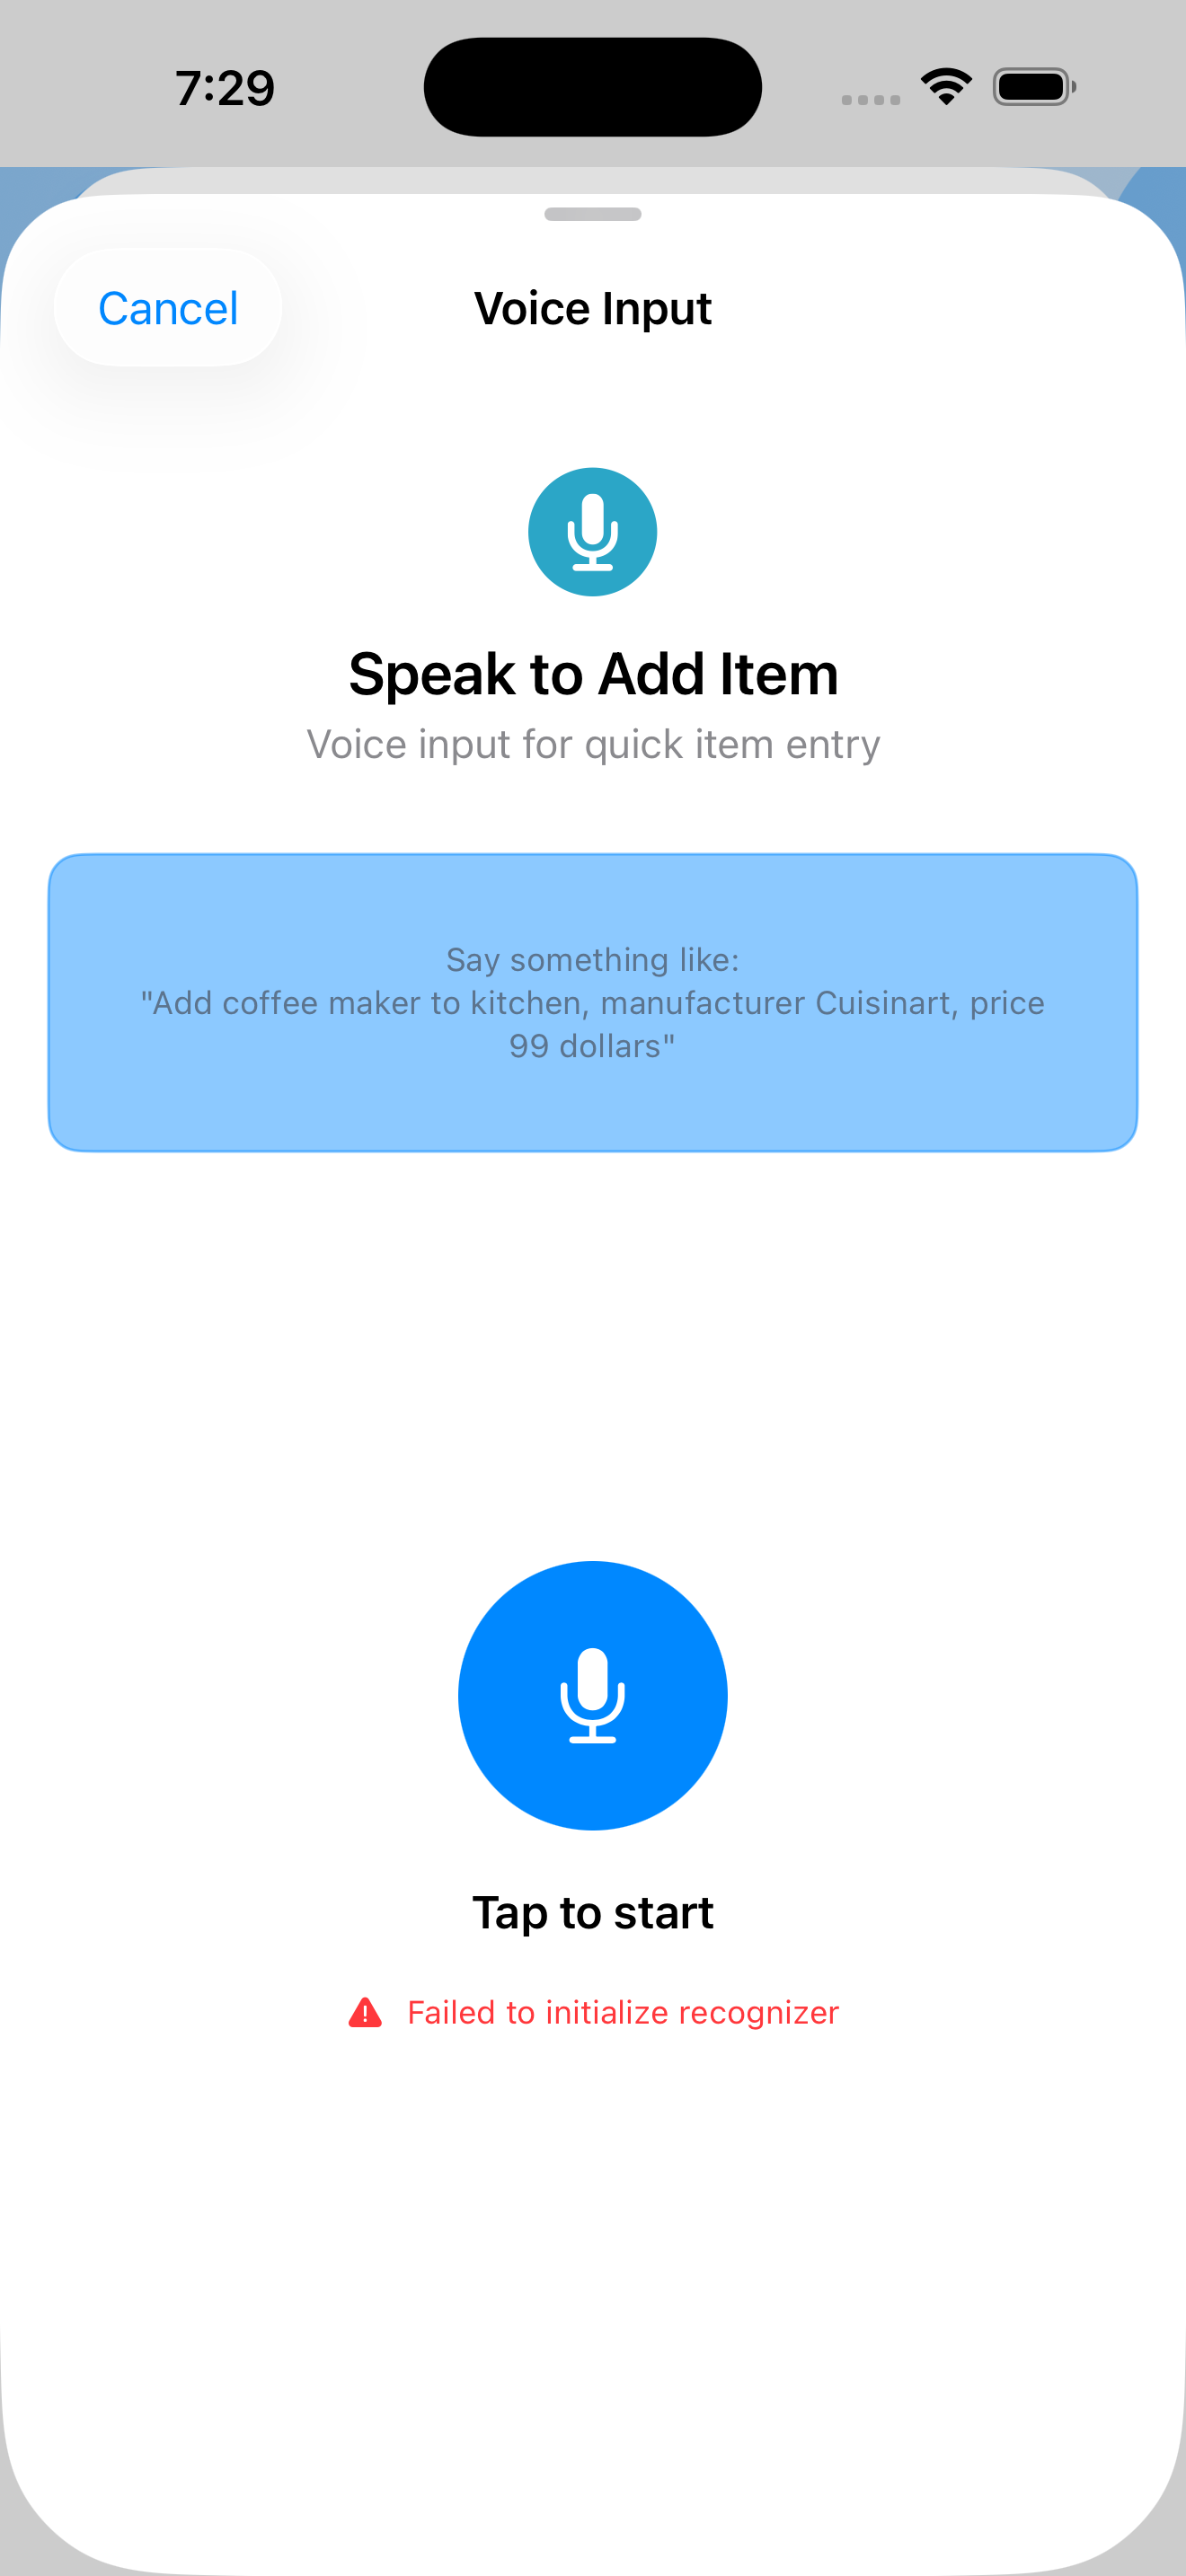
- Tap Voice in the "More ways to add" tier
- The first time you use Voice, a tip sheet appears with example phrasings. Tap Got it to continue.
- Tap the microphone and speak naturally. Example: "Add coffee maker to kitchen, manufacturer Cuisinart, price 99 dollars"
- Voice parses what it heard into:
- Title (e.g., "coffee maker")
- Room / Location ("kitchen")
- Manufacturer ("Cuisinart")
- Price ("$99.00")
- Model number and serial number (if you speak them)
- The form appears with those fields filled in. Review, adjust anything that was misheard, and save.
💡 Tip: Voice is also available inside any Add or Edit form — tap the mic icon next to the Product Name field to dictate without leaving the form.
Paste & Drop shortcuts
If you already have an image (a screenshot of an Amazon order, a saved photo from a friend, an image you copied from a website), you can skip the picker entirely.
- Paste — Copy an image to your clipboard, then tap the Paste button in the chooser. The image becomes the item's first photo and the form opens. Works on iPhone, iPad, and Mac.
- Drop — Drag an image from Photos, Files, or another app into the drop zone at the bottom of the chooser. iOS only for now.
💡 Tip: Dropped or pasted images default to the Product Photo type. If the image you dropped is actually a receipt or label, you can change its type inside the form after the item is created.
Filling Out the Product Form
The form has these fields (only Product Name is required):
Step 1: Enter Basic Information
- Product Name (Required)
- Tap the text field
- Type the product name (e.g., "Samsung 65-inch TV")
- This is how the item appears in your list
- Manufacturer
- Tap the text field
- Type the brand name (e.g., "Samsung")
- Model Number
- Tap the text field
- Enter the model number from the product label
- Example: "QN65Q80CAFXZA"
- Serial Number
- Tap the text field
- Enter the serial number (important for warranty claims)
- Usually found on a sticker on the item
Step 2: Choose a Category
- Tap the Category field
- A picker appears with 20+ categories: Electronics, Appliances, Furniture, Tools, Automotive, Sports, Kitchen & Dining, Personal Care, Antique/Collectable, Recreation (boats, RVs, ATVs, and other recreational vehicles), and more
- Scroll and tap to select the appropriate category
- The picker closes automatically
Step 3: Set Location
- Tap the Location field
- Type where the item is stored (e.g., "Living Room", "Garage")
- This helps you find items later
Step 4: Enter Purchase Information
- Acquisition Type
- Select how you got this item: Purchased New, Purchased Used, Inherited, Gifted, Found/Salvaged, or Not Specified
- The form adapts based on your choice — gifts hide the price field, inherited items show provenance options
- Purchase Date
- Tap the date field
- A date picker appears
- Scroll to select month, day, and year
- Tap Done (iOS) or click outside the picker (Mac)
- Purchase Price
- Tap the price field (hidden for gifts and inherited items)
- Enter the amount you paid (numbers only)
- Currency symbol is added automatically
- Additional Costs (Optional)
- Add shipping, taxes, accessories, or modifications
- Stuffolio calculates your total investment automatically
- Items acquired below market value are highlighted as a "great find"
- Retailer (Optional)
- Enter where you bought it (e.g., "Best Buy", "Amazon")
Step 5: Enter Warranty Information
- Warranty Expiration Date — Select the date your warranty ends
- Warranty Type — Tap to select: Standard, Extended, or Lifetime
- Warranty Notes (Optional) — Add any coverage details
Step 6: Add Notes
- Tap the Notes field
- Type any additional information
- Examples: "Gift from Mom", "Bought on sale", "Repair history"
Step 7: Save the Product
- Review all entered information
- Tap the Save button (top-right on iOS, toolbar on Mac)
- The item is added to your inventory
- You return to the My Items list
Progressive Form Disclosure
To keep forms organized and easier to navigate, Stuffolio uses collapsible sections (called Disclosure Groups) that you can expand or collapse as needed.
How It Works
- Collapsed by default — Optional sections like "Additional Details" start collapsed to reduce visual clutter
- Expand to view — Tap any section header to reveal its fields
- Collapse when done — Tap the header again to hide the fields
- Focus on what matters — Only expand the sections you need to fill out
Example Sections
- Basic Information — Always visible (Product Name, Manufacturer, Model)
- Additional Details — Collapsible section for optional fields like Serial Number, Category, Location
- Purchase Information — Collapsible section for Purchase Date, Price, Retailer
- Warranty Information — Collapsible section for warranty dates and coverage details
Tip: You can leave sections collapsed if you don't need to enter information in them. Only required fields need to be completed.
Back to ContentsAdding Photos to Items
Photos help identify products and serve as documentation for warranty claims. Stuffolio can also analyze your photos to automatically suggest categories and extract product details.
Quick Start Photo Options
When adding a new item, the Quick Start section at the top offers fast ways to add photos with intelligent analysis:
- Tap Add Photo in Quick Start
- Choose a photo from your library or camera
- A Photo Assessment screen appears showing:
- Preview of your selected photo
- Quality assessment (blur, resolution, text detection)
- Suitability indicators for each analysis type
Three Analysis Options
| Option | What It Does | Best For |
|---|---|---|
| Suggest Category | Uses on-device AI to identify the product type | Product photos showing the item clearly |
| Extract Details | Uses cloud OCR to read text and fill form fields | Receipts, labels, nameplates with visible text |
| Just Add Photo | Adds the photo without analysis | Any photo you want to keep |
Understanding Suitability Indicators
Each option shows how well your photo matches that analysis type:
- Good match — Photo is well-suited for this analysis
- May work — Analysis might succeed, but results may vary
- Poor match — Photo unlikely to yield good results (e.g., blurry or no text detected)
Extract Details (OCR Auto-Fill)
The Extract Details option can automatically populate form fields by reading text from your photo:
What It Extracts
- Brand/Manufacturer — From product labels or receipts
- Model Number — From nameplates or packaging
- Serial Number — From product labels
- Purchase Price — From receipts
- Purchase Date — From receipts
- Store/Retailer — From receipts
How to Use
- Select a photo showing a receipt, label, or nameplate
- Tap Extract Details
- Wait for OCR processing (requires internet)
- Extracted fields are automatically filled in the form
- Review and edit as needed
- Photograph labels and receipts straight-on (not at an angle)
- Ensure good lighting with no shadows on text
- Get close enough that text is clearly readable
- For receipts, capture the full receipt including store name and date
Voice Input (Hands-Free Entry)
Voice Input lets you add items without typing. Speak naturally and Stuffolio parses your words into form fields. Voice input works in both Add Item and Edit Item forms.
Finding the Mic Button
The microphone button appears in two locations:
- Next to Product Name — A blue mic icon appears directly beside the Product Name field for quick access
- Quick Start section — Also available in the expandable Quick Start card at the top of the form
First-Time Tip
The first time you tap the mic button, a helpful tip sheet appears showing:
- Example voice commands
- Supported fields you can set by voice
- Tips for getting the best results
Tap Try It to proceed to voice input, or Close to dismiss. The tip only appears once — after that, tapping the mic goes directly to voice input.
How to Use Voice Input
- Tap the microphone button (next to Product Name or in Quick Start)
- Grant microphone and speech recognition permissions (first time only)
- Tap the mic icon to start recording
- Speak naturally, including any details you want to add
- Review the parsed fields in the preview
- Tap Use This Input to apply fields to the form
Example Voice Commands
- "Add coffee maker to kitchen, manufacturer Cuisinart, price 99 dollars"
- "Add Samsung TV to living room, model QN65S95D"
- "Add iPhone 15 Pro, brand Apple, serial number ABC123"
Recognized Fields
| Field | How to Say It |
|---|---|
| Title | "Add [item name]" or "Adding [item name]" |
| Room/Location | "to kitchen", "in the garage", "to office" |
| Manufacturer | "manufacturer Apple", "brand Samsung", "by Sony" |
| Price | "$99", "99 dollars", "price 1299" |
| Model Number | "model ABC123", "model number XYZ" |
| Serial Number | "serial ABC789", "serial number XYZ" |
| Category | Keywords like "electronics", "furniture", "tools" — vehicle keywords like "bicycle", "bike", and "scooter" route to the Vehicles category |
Adding Photos on iPhone/iPad
From the Add/Edit Product Screen:
- Scroll to the Photos section
- Tap the camera icon or Add Photo button
- A menu appears with options
Option A: Take a New Photo
- Tap Take Photo
- The camera opens
- Point at your item
- Tap the shutter button to capture
- Review the photo:
- Tap Retake to try again
- Tap Use Photo to add it
- The photo appears in the Photos section
Option B: Choose from Photo Library
- Tap Choose from Library
- Your photo library opens
- Browse albums or use search:
- Tap Albums to browse by album
- Tap the search icon and type to find photos
- Tap a photo to select it
- Optionally crop the image:
- Drag corners to adjust
- Tap Done when finished
- The photo appears in the Photos section
Option C: Scan a Document
- Tap Scan Document
- The document scanner opens
- Position the receipt/document in view
- The scanner automatically detects edges
- Tap the shutter or wait for auto-capture
- Adjust corners if needed by dragging
- Tap Keep Scan
- Tap Save when done scanning
Adding Photos on Mac
Method 1: Paste from Clipboard (Required Step)
- First, you must copy an image:
- In Photos app: Select image, press ⌘C
- In Finder: Select image file, press ⌘C
- From web: Right-click image, select "Copy Image"
- In Stuffolio, open the item for editing
- Click the Paste Image button in the Photos section
- The copied image appears
Method 2: Drag and Drop
- Open Finder or Photos app alongside Stuffolio
- Drag an image file onto the Photos section
- Drop when you see the highlight
- The image is added
Method 3: Choose File
- Click Add Photo or the + in the Photos section
- Click Choose File
- Navigate to your image file
- Select it and click Open
Managing Existing Photos
- To view full-screen: Tap/click any photo thumbnail. Pinch to zoom (iOS) or use scroll wheel (Mac).
- To delete: Tap/click the photo, then tap the trash icon or press Delete.
- To reorder: Touch and hold (iOS) or click and drag (Mac) to new position.
Photo Types to Add
For complete documentation, consider adding:
- Product Photo — Main image showing the product
- Receipt — Proof of purchase for warranty claims
- Label/Nameplate — Shows model and serial numbers
- Warranty Card — Coverage documentation
- Packaging — UPC barcode and specifications
Using the Smart Scanner
The Smart Scanner reads barcodes to automatically fill in product information.
Opening the Smart Scanner
iPhone Tap the + button on My Items, then tap Smart Scanner
iPad/Mac Go to Tools in the sidebar, under Capture, tap Smart Scanner
Step 1: Scan the UPC Barcode
- The camera view appears with a targeting rectangle
- Point your camera at the UPC barcode on the product packaging
- Hold steady 6-12 inches away
- When detected:
- You hear a beep
- The barcode number appears on screen
- Product lookup begins automatically
- Ensure good lighting (avoid shadows on the barcode)
- Make sure the barcode isn't wrinkled or damaged
- Hold the phone parallel to the barcode (not at an angle)
- Clean your camera lens if scanning fails repeatedly
Step 2: Scan Additional Barcodes (Optional)
- Tap Scan Model/Serial
- Point at barcodes on the product itself (not packaging):
- Model number barcode (often on nameplate)
- Serial number barcode
- The scanner identifies the barcode type
- Information fills automatically
- Tap Done when finished, or Skip to continue without
Step 3: Review and Edit
- A form appears with auto-detected information
- Review each field and edit any incorrect information
- Add purchase information: Purchase Date, Purchase Price, Warranty Expiration
Step 4: Save the Product
- Verify all information is correct
- Tap Save in the top-right corner
- The item is added to your inventory
If the Barcode Isn't Found
- A message appears: "Product not found in database"
- Tap Enter Manually
- The barcode number is preserved
- Fill in the remaining fields yourself
- Save as usual
Batch Scanning Mode
Batch Scanning Mode lets you scan multiple barcodes in rapid succession, perfect for when you need to add several items to your inventory at once. Instead of adding items one by one, you can scan everything first, review the results, and save them all together.
When to Use Batch Scanning
- Moving into a new home — Catalog appliances and belongings
- Shopping haul — Add multiple new purchases quickly
- Estate management — Inventory inherited items
- Spring cleaning — Document everything in a room
- Insurance documentation — Create a complete inventory fast
Opening Batch Scanner
iPhone Tap the + button on My Items, then tap Batch Scanner
iPad/Mac Go to Tools in the sidebar, under Capture, tap Batch Scanner
Step 1: Scanning Multiple Barcodes
- The camera view opens with a scanning target rectangle
- Point your camera at the first item's UPC barcode
- Hold steady 6-12 inches away from the barcode
- When detected:
- You hear a beep sound
- The barcode number appears briefly
- The camera remains active for the next scan
- Immediately scan the next item's barcode
- Continue scanning as many items as you need
- The scanner stays open until you tap Done
- Work in good lighting to speed up detection
- Keep items organized so you can scan them in sequence
- The scanner automatically looks up each barcode in the background
- You can scan as many items as needed - there's no limit
- If a barcode won't scan, skip it and scan manually later
Step 2: Reviewing Scanned Items
- Tap Done when you've finished scanning
- The review screen appears showing all scanned items
- Each item displays:
- Product photo (if found in the database)
- Product name
- Manufacturer
- Barcode number
- Status indicator:
- Found Product info retrieved successfully
- Not Found Barcode not in database (you'll add info manually)
- Failed Lookup error occurred
Step 3: Managing the Scanned List
Viewing Product Details
- Tap any item in the list
- A detail view shows all retrieved product information
- Review: Name, Manufacturer, Model, Description, Category
- Tap Back to return to the list
Removing Unwanted Items
- Swipe left on any item you want to remove
- Tap the Delete button
- The item is removed from the batch (doesn't affect saved items)
Retrying Failed Lookups
If some barcodes couldn't be found or failed to load:
- Look for items marked with Failed or Not Found
- Tap the item to open its detail view
- For "Failed" items:
- Tap Retry Lookup at the bottom
- Wait for the system to search again
- If successful, the status updates to Found
- For "Not Found" items:
- You'll need to enter product information manually when saving
- The barcode number is preserved for your records
Step 4: Saving All Items
- Review your entire list to ensure accuracy
- Tap Save All at the bottom of the screen
- A confirmation appears showing how many items will be added
- Tap Confirm to proceed
- All items are added to your inventory simultaneously
- You return to the My Items list
- A success message appears: "X items added to inventory"
After Saving: Adding Additional Information
Products saved from Batch Scanner include basic information from the barcode database. To add more details:
- Go to My Items
- Find the newly added items (they appear at the top if sorted by Date Added)
- Tap an item to open it
- Tap Edit
- Add: Photos, Purchase Date, Purchase Price, Warranty Information, Location, Notes
- Tap Save
Canceling a Batch Scan
If you want to exit without saving:
- Tap Cancel in the top-left corner
- A confirmation dialog appears: "Discard scanned items?"
- Tap Discard to exit without saving
- Or tap Keep Scanning to return
Troubleshooting Batch Scanning
Barcode Won't Scan
- Ensure the barcode is not wrinkled, damaged, or covered
- Try different angles and distances (6-12 inches works best)
- Improve lighting - avoid shadows or glare on the barcode
- Clean your camera lens
- If it still won't scan, skip it and add manually later
Product Information Is Incorrect
- After saving, you can edit any item to correct the information
- Go to My Items, tap the item, tap Edit, make changes, and Save
I Accidentally Scanned the Same Item Twice
- Before saving: Swipe left and delete the duplicate
- After saving: Go to My Items, swipe left on the duplicate, and delete it
Multi-Photo Capture
Multi-Photo Capture lets you take multiple photos of different types (product images, receipts, nameplates) in a single session and attach them all to an item at once. This streamlines the documentation process by keeping you in the camera flow instead of having to add photos one at a time.
When to Use Multi-Photo Capture
- Complete documentation — Capture product, receipt, and nameplate in one session
- Multiple angles — Take photos from different sides or perspectives
- Detailed records — Document condition, damage, or unique features
- New purchases — Photograph everything while items are still accessible
- Insurance claims — Create thorough visual documentation
Opening Multi-Photo Capture
iPhone/iPad
- Open the item you want to photograph (or create a new item)
- Tap Edit if viewing an existing item
- Scroll to the Photos section
- Tap the camera icon or Add Photos button
- Select Multi-Photo Capture from the menu
Alternative Quick Access
- From Tools > Capture > Multi-Photo Capture
- This creates a new item with photos attached
Step 1: Selecting Photo Type
- The Multi-Photo Capture screen opens
- At the top, you'll see three photo type options:
- Product — General photos of the item
- Receipt — Purchase receipts or invoices
- Nameplate — Labels showing model and serial numbers
- Tap the photo type you want to capture
- The selected type is highlighted
- Stuffolio automatically organizes photos by type
- Receipt photos can be processed for purchase date and price
- Nameplate photos help with model/serial number identification
- You can change the type before taking each photo
Step 2: Taking Photos
Capturing Your First Photo
- Tap the large camera button
- The camera viewfinder opens
- Frame your subject in the viewfinder
- Tap the shutter button (circle) to capture
- Review the captured photo:
- Tap Use Photo to accept it
- Tap Retake to try again
- Once accepted, you return to the Multi-Photo Capture screen
- The photo appears as a thumbnail at the bottom
Adding More Photos
- Change the Photo Type if needed (tap Product, Receipt, or Nameplate)
- Tap the camera button again
- Take another photo following the same process
- Repeat as many times as needed
- Each new photo appears in the thumbnail strip at the bottom
Photo Type Workflow Example
- Select Product, tap camera, photograph the item from the front
- Stay in Product mode, tap camera again, photograph from the side
- Switch to Receipt, tap camera, photograph the purchase receipt
- Switch to Nameplate, tap camera, photograph the model/serial number label
- You now have 4 photos ready to save
Step 3: Reviewing Photo Thumbnails
The bottom of the screen shows thumbnails of all captured photos:
- Photo thumbnail — Small preview of the image
- Photo type badge — Shows if it's Product, Receipt, or Nameplate
- Number indicator — Order in which photos were taken
Viewing Full-Size Photos
- Tap any thumbnail
- The photo opens in full-screen view
- Pinch to zoom in or out
- Tap Done or swipe down to close
Step 4: Removing Unwanted Photos
Before saving, you can remove any photos you don't want:
- In the thumbnail strip, find the photo to remove
- Tap the X button in the corner of the thumbnail
- Or tap the thumbnail to open it full-screen, then tap the trash icon
- Confirm deletion
- The photo is removed from the session (not saved)
Step 5: Saving All Photos to an Item
If Editing an Existing Product
- Review all thumbnails to ensure you have the photos you need
- Tap Save Photos at the bottom of the screen
- All photos are attached to the item
- You return to the Edit Product screen
- The photos appear in the Photos section
- Tap Save at the top to save the item with its new photos
If Creating a New Product from Actions Menu
- After capturing photos, tap Done
- The Add Product form opens
- All captured photos are already attached (visible in Photos section)
- Fill in the item details: Name, Manufacturer, Category, etc.
- Tap Save to create the item with photos
Photo Capture Tips
For Product Photos
- Use good lighting - natural light works best
- Capture multiple angles: front, back, sides, top
- Include the entire item in the frame
- For large items, step back to get the full view
- For small items, get close enough to show detail
For Receipt Photos
- Lay the receipt flat on a contrasting surface
- Ensure all text is readable - zoom in if needed
- Avoid shadows across the receipt
- Capture the entire receipt including header and footer
- Make sure date and price are clearly visible
For Nameplate Photos
- Get close to the label to make text readable
- Hold the camera parallel to the label (not at an angle)
- Ensure model number and serial number are in focus
- Add extra light if the label is in a dark area
- Common locations: bottom, back, inside door, battery compartment
Editing Photo Types After Capture
If you assigned the wrong type to a photo:
- After saving photos to the item, open the item
- Tap Edit
- In the Photos section, tap and hold a photo
- Select Change Type from the menu
- Choose the correct type: Product, Receipt, or Nameplate
- Tap Save
Canceling Multi-Photo Capture
To exit without saving photos:
- Tap Cancel in the top-left corner
- A confirmation dialog appears: "Discard all photos?"
- Tap Discard to exit without saving
- Or tap Continue to return to the capture session
Troubleshooting
Photos Are Blurry
- Hold the device steady when capturing
- Tap the screen to focus before pressing shutter
- Ensure there's adequate lighting
- Clean your camera lens
Wrong Photo Type Was Selected
- Before saving: Remove the photo and retake it with correct type
- After saving: Edit the item and change the photo type as described above
Photos Didn't Save
- Make sure you tapped "Save Photos" in the Multi-Photo Capture screen
- Then tapped "Save" in the Edit Product screen
- Check your device has sufficient storage space
- If photos are missing, return to the item and use Multi-Photo Capture again
- Product photos (2-4 angles)
- Receipt photo (1 clear image)
- Nameplate photo (1-2 close-ups)
Using Stuff Scout (AI Assistance — When You Ask)
Stuff Scout uses AI to identify antiques, collectibles, and unknown items from photos. Stuffolio's AI is user-initiated and non-ambient — nothing is analyzed or sent to external services unless you explicitly ask for help.
Opening Stuff Scout
iPhone Tap the + button on My Items, then tap Stuff Scout
iPad/Mac Go to Tools > Decisions > Stuff Scout, or tap the Stuff Scout feature card on the Dashboard
Step 1: Capture Photos
- The Stuff Scout screen opens with capture options
- Taking a New Photo: Tap Take Photo, position the item in good lighting, capture and tap Use Photo
- Choosing from Library: Tap Choose from Library, select a clear photo of the item
Step 2: Add Additional Photos (Recommended)
For better identification, add multiple photos (up to 5):
- After the first photo, use the buttons below the thumbnail strip to add more
- Capture different angles:
- Maker's Mark — Signatures, stamps, or labels
- Bottom/Back — Often has identifying marks
- Details — Close-ups of unique features
- Damage — Any wear or repairs
- You can add up to 5 photos
Step 3: Choose Scan Depth
Before starting analysis, select how thorough you want Stuff Scout to be:
- Quick ID (~15 seconds) — Fast identification only. Best for when you just need to know what something is.
- With Pricing (~25 seconds) — Identification plus marketplace verification and current value estimates. Recommended for most items.
- Full Appraisal (~40 seconds) — Complete analysis including historical context, provenance research, condition assessment, and detailed valuation. Best for antiques, collectibles, and potentially valuable items.
✍️ Pre-Scan Context (Optional)
Before you tap Identify, the capture screen offers a collapsible card labeled "What do you know about this item?" Tap to expand it and type anything you already know — provenance, maker's marks you can read, a date stamped on the back, a brand name printed on the box.
Story-First Refinement also exists after a scan, but pre-scan context is the cheaper path when you have details up front. Feeding Scout "Ernst Roth violin, 1945, Markneukirchen" before the first analysis often produces a more accurate result on pass one than scanning blind and refining afterward. Skip it entirely for everyday items where you have nothing to add — the field is optional.
Step 4: Start Identification
- Review your photos at the bottom of the screen
- Tap the Identify button
- Wait while AI analyzes (time depends on your selected scan depth)
Background Processing
You don't need to keep the app open while Stuff Scout analyzes your photos:
- After tapping Identify, you can switch to another app or lock your device
- Analysis continues in the background
- When complete, you'll receive a notification: "Stuff Scout Complete"
- Tap the notification to view your results
Background Results Inbox
Completed background scans collect in a dedicated Background Results sheet you can open from the Stuff Scout screen. Each completed scan represents a paid quota item, so the sheet has a confirmation alert before Clear All wipes the list — no one-tap purge of background work you paid for. Tap an individual result to open its full Scout view, or remove rows one at a time without affecting the others.
If Analysis Fails
Scout analysis can fail for transient reasons — flaky Wi-Fi, a brief worker hiccup, a request that took too long. The error alert now offers a Try Again button that re-runs analysis on the same photos without making you re-capture or re-navigate. The retry is suppressed for quota-related errors, since waiting for your refill (not retrying immediately) is the right move there.
Step 5: Review Results
The results screen shows:
- Identification — What It Is, Maker/Manufacturer, Era, Country of Origin
- Value — Estimated Value Range, Recent Sales, Classification
- Additional Info — Rarity, About, Collector Notes
🎯 Confidence Gate
After every fresh scan, Scout asks "Is this right?" with three paths:
- Yes, that's it — Save the result as-is and continue to Add to Inventory.
- Almost, I can add more — Opens the refinement flow (see Story-First Refinement below).
- No, that's not it — Start over with a different approach — different photos, better angles, or a fresh identification attempt.
The Confidence Gate exists so you never accept a wrong answer by default. Scout won't stop asking until you tell it the identification is correct.
When you open a saved scan from Scout History or follow a deep link to a past result, the gate is hidden — there's no live refinement to launch from a historical view, so the prompt would just be a dismiss trap.
✍️ Story-First Refinement
When you choose "Almost, I can add more," a large text area invites you to describe what you know in plain language:
- "This belonged to my grandfather, might be from the 1940s"
- "Bought at an estate sale in rural Pennsylvania"
- "The stamp on the bottom looks German to me"
Structured fields — maker's mark, serial number, era, model number — are collapsed as optional extras below the text area. Fill them in only if they help. Story first, form fields second.
Tips for best refinement results:
- Add photos of any maker's marks, stamps, or labels (tap Add or Paste from clipboard)
- Be specific about brand names and model numbers if you know them
- Mention visible markings, signatures, or patent numbers
- Include known history or where you found the item
Each refinement uses 1 AI Assistant search from your allowance.
🧠 Context Veracity
Scout evaluates your notes critically, not as gospel:
- Specific facts (artist names, serial numbers, museum attributions, patent dates) are verified against visual evidence.
- Speculative guesses ("I think it might be old," "looks like something from the 1800s") are treated as hypotheses to investigate, not facts to accept.
The effect: speculation won't push Scout off course. You can write freely without worrying that a wrong guess will derail the identification.
📜 Refinement History
As you refine, Scout tracks how each round of added context changed the identification and valuation. After refining, you can see:
- What Scout got right on the first pass
- What changed after you added context
- How your notes shifted the value range or narrowed the era
Refinement History is your record of what the AI figured out on its own vs what you contributed.
🛍️ Category-Specific Valuation
Price verification routes to the right marketplaces based on what the item is — apples-to-apples comparisons, not generic listings:
- Instruments — Checks instrument marketplaces for guitars, violins, synths, pro audio gear
- Collectibles & Antiques — Checks eBay sold listings for dinnerware, figurines, memorabilia
- Vintage Goods — Checks Etsy for handmade and vintage items
- Vehicles — Checks vehicle-specific sources (KBB-style pricing for RVs, boats, motorcycles)
Scout picks the marketplace that matches your item's category so the value estimate reflects what it would actually sell for.
💲 Asking vs. Sold Prices
Scout's pricing display distinguishes two different market signals so you can read them correctly:
- Asking prices — What sellers are currently listing the item for. Useful to see the current shelf reality, but asking prices include unsold items that may never move at that price.
- Sold prices — What buyers actually paid in completed transactions. The more reliable signal for "what would this realistically sell for."
When both are available, Scout shows them side-by-side with source attribution (which marketplace each number came from). When only one is available — common for niche categories — Scout names which one it is so you're never reading an asking price as if it were a sold price.
Confidence Floor and Hybrid Floor
Scout will refuse to display a price when there aren't enough comparable listings to support a defensible number. Instead of inventing a confident-sounding estimate from one or two cherry-picked listings, you'll see an honest "not enough comps to value this with confidence" note and the option to refine the search with additional context. This is the confidence floor.
The hybrid floor handles the middle case: when sold-price data is too thin to stand alone but asking-price data is plentiful, Scout falls back to a wider range derived from both signals, clearly labeled as such. The floor exists so you never see a single-source point estimate dressed up as a market price.
Graded Coin Extraction
For coins and graded collectibles, Scout reads the grading-company designation and numeric grade from your photos (e.g., PCGS MS-65) and matches against comps with the same grading. A 1921 Morgan Dollar in PCGS MS-65 is a completely different market from the same coin raw or in a lower grade; Scout's pricing reflects that distinction instead of averaging across grades.
🎯 Curate the Comps (Tier 1 Filter)
Scout shows you the comparable sales it used to build the estimate. Sometimes one or two of those comps clearly don't belong — a damaged piece, a different model, a parts-only listing. The Tier 1 filter lets you exclude individual comps and watch the estimate re-aggregate from the pool you kept.
How to exclude a comp:
- iPhone/iPad Long-press any row in Recent Sales, then tap Exclude from estimate.
- Mac Right-click (or Control-click) any row in Recent Sales, then click Exclude from estimate.
- VoiceOver: Use the Actions rotor on the row and select Exclude from estimate.
Excluded comps move to a desaturated Excluded (N) subsection just below the Recent Sales list, so the audit trail of what you removed stays visible. To put a comp back, open the same context menu on the excluded row and choose Restore to estimate, or use Restore all at the top of the Excluded section.
The filtered estimate panel. As soon as you exclude one comp, a blue "Your filtered estimate" panel appears between the Recent Sales list and the story sections. It shows: how many comps you kept ("Using 8 of 10 comps you kept"), the recomputed low-to-high range, and the median. Three result shapes:
- Range — 6 or more comps kept. Full percentile band, same math as Scout's headline estimate.
- Approximate — 3 to 5 comps kept. Range collapses to a median with the caveat "Approximate — few comps remaining."
- Too few comps — fewer than 3 kept. Estimate hides with "Need at least 3 comps to estimate — restore one to continue." Scout won't show a number it can't defend, even on a curated pool.
Save filtered estimate. When you've been working from an existing item (Scout Refinement, not a fresh scan), the panel includes a Save filtered estimate button. It appends the filtered range to that item's price history with a note recording which comps you excluded — so you can reconstruct the decision later.
🔬 Research Tips
Scout suggests specific starting points for deeper research — forums, subreddits, reference databases, YouTube channels — matched to your item's category. For a vintage camera, that might include r/AnalogCommunity and CameraQuest. For a violin, the Maestronet forums. Starting points, not a walled garden.
Saving & Sharing Results
After Stuff Scout identifies your item, you can save and share the results:
- Copy Individual Sections — Tap the copy button next to any section (identification, pricing, history) to copy that text
- Export Full Report — Tap Share to export the complete report via Messages, Mail, or any sharing app
- Value Auto-Update — Scout valuations automatically flow to your item's market price records, keeping value tracking current
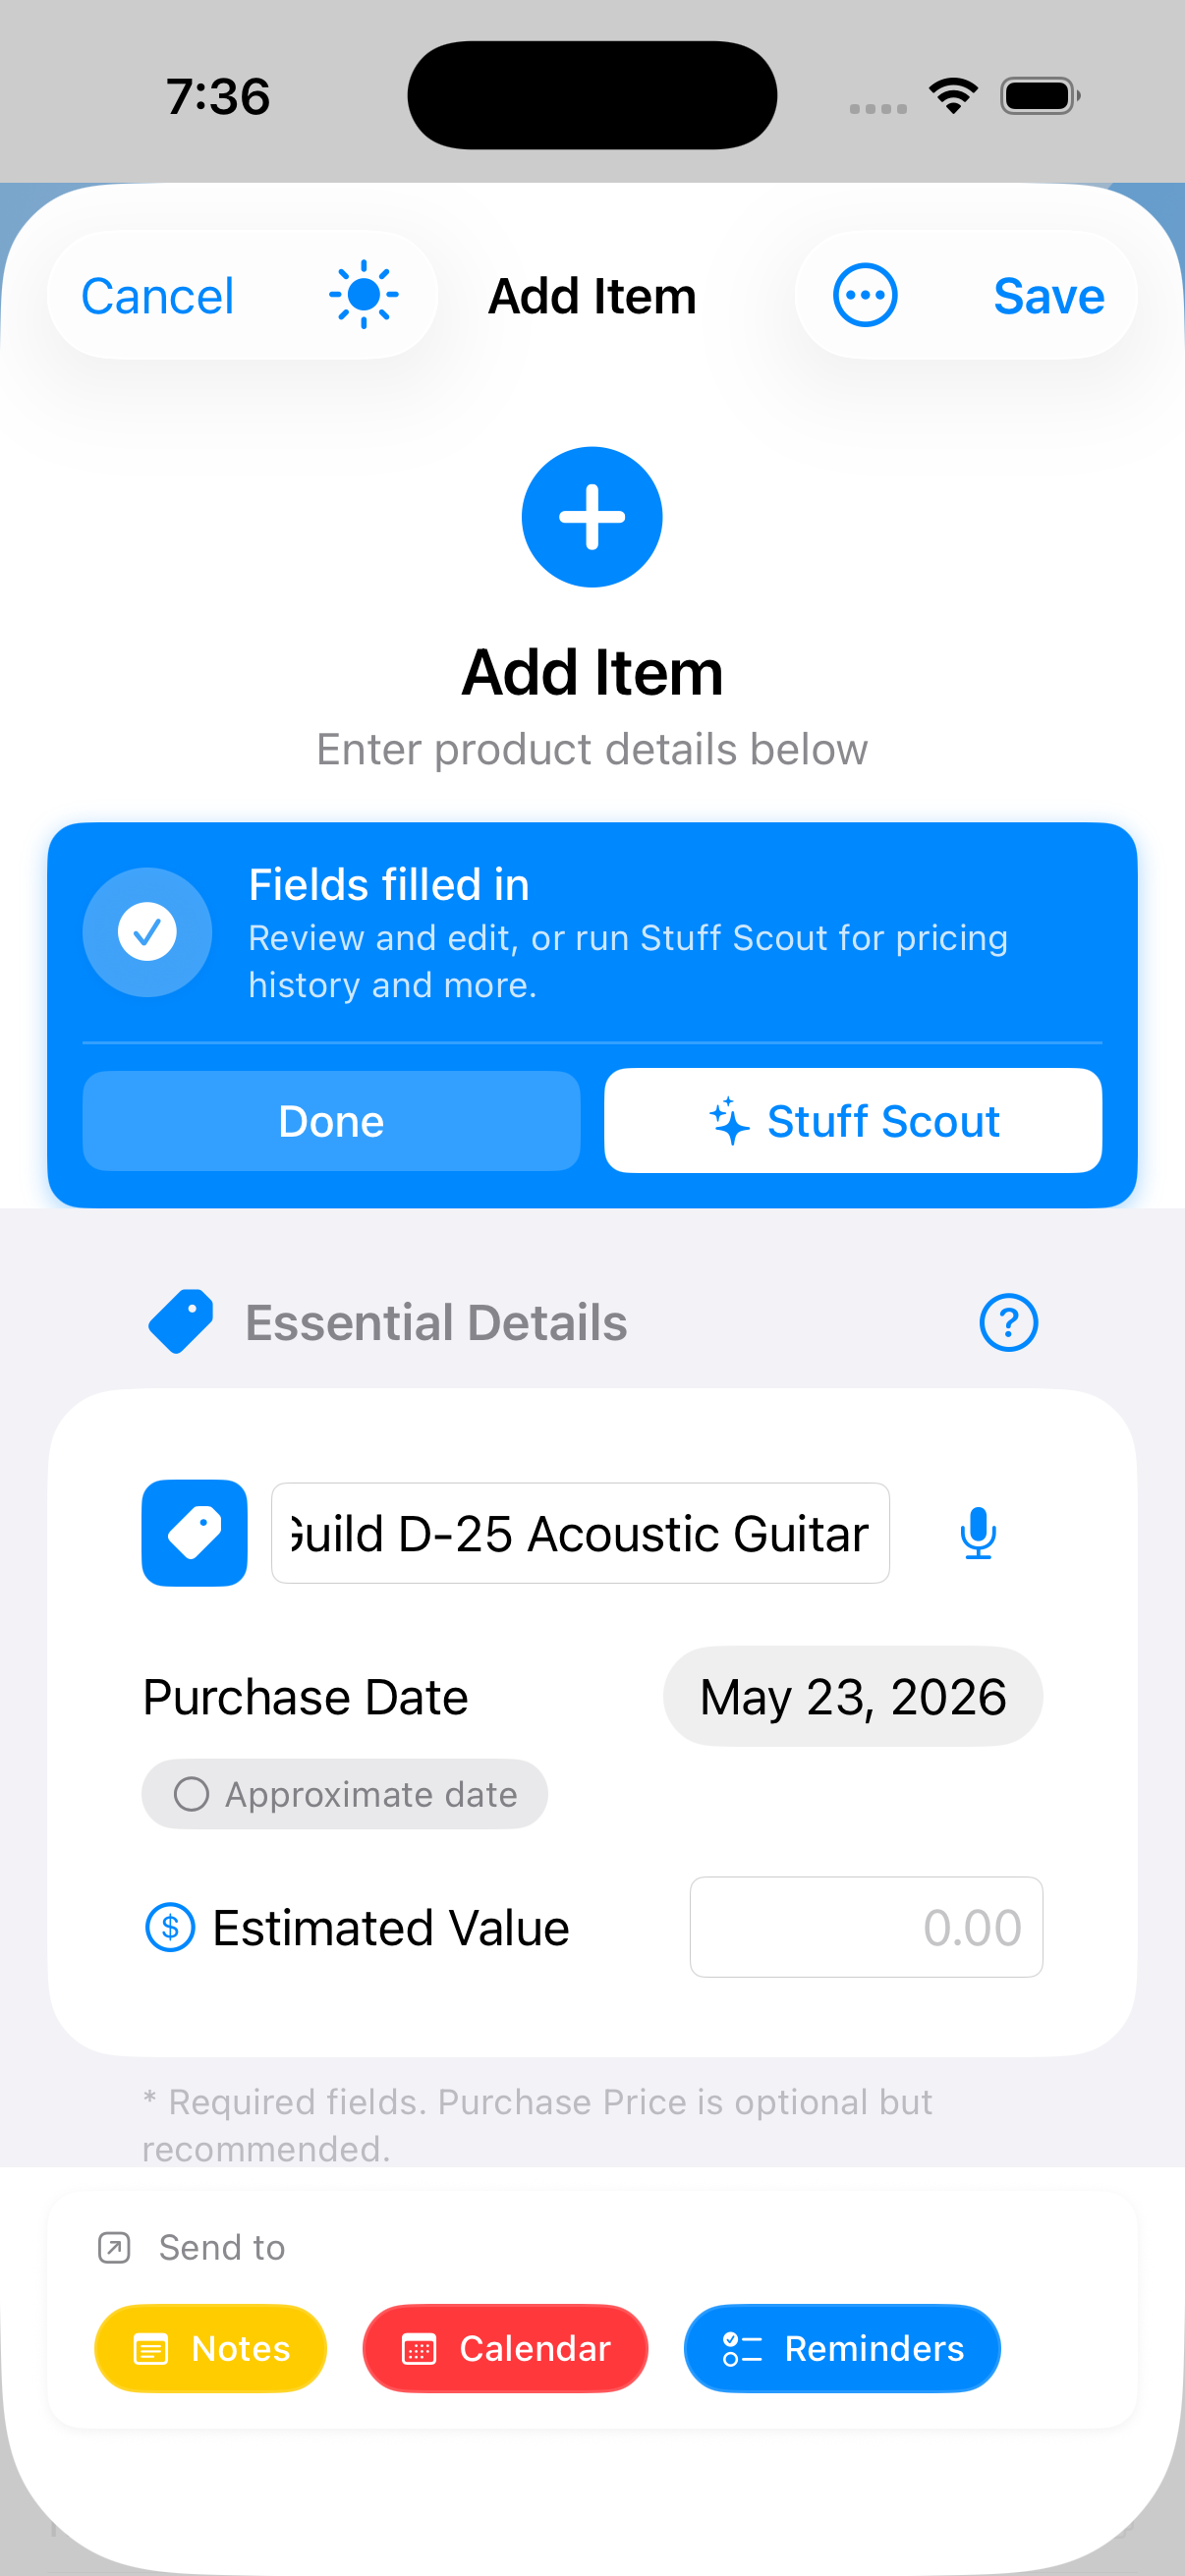
Step 6: Save to Inventory
- Tap Add to Inventory
- A preview sheet appears showing the pre-filled item details
- Optional: Add a receipt photo (see Receipt Pairing below)
- Tap Add to Inventory to open the full form
- Add any additional information
- Tap Save
Receipt Pairing (Optional)
When adding a Stuff Scout result to your inventory, you can pair it with a receipt to auto-fill purchase details:
- After tapping Add to Inventory, look for the Purchase Receipt section
- Tap Add Receipt Photo
- Capture or choose a photo of your receipt
- Stuffolio extracts store name, purchase date, and price automatically
- The extracted data appears in the preview — verify it's correct
- Tap Add to Inventory to continue with all data pre-filled
Auto-fill from Receipt
If you've already attached receipt images to an item, you can extract purchase details without re-scanning:
- Open the item and tap Edit
- Look for the Auto-fill from Receipt button in the Images section
- Tap it to have Stuffolio analyze your attached receipt images
- Review the extracted store name, purchase date, and price
- Tap Save to apply the changes
Auto-Cached Recent Scans
Every Stuff Scout analysis is automatically saved — you'll never lose results by navigating away:
- Automatic saving: Results save to Recent Scans immediately when analysis completes
- Last 25 scans kept: The most recent 25 scans are always available
- FIFO cleanup: When you exceed 25 scans, the oldest is automatically removed
- Promote to bookmark: Swipe right on any recent scan to save it permanently
Scout History
Access your saved Stuff Scout results anytime:
- Go to Stuff Scout > History
- Choose a tab:
- Recent — Auto-saved scans (last 25)
- Bookmarks — Permanently saved scans
- Tap any scan to view full details
- Swipe right to bookmark (Recent tab only)
- Swipe left to delete
- Use Clear All to remove all recent scans
Scout Refinement (Edit Existing Items)
Already have an item in your inventory? You can re-analyze it with Stuff Scout to discover additional details. Scout now uses your existing form data (manufacturer, model, notes) as context for smarter, more accurate analysis.
Opening Scout Refinement
- Open Edit for any existing item
- Scroll down to find the Stuff Scout section
- Tap to expand the section
- The section shows guidance: "The more you fill in, the better Scout's analysis"
If the Item Has Photos
- The section shows how many photos are available
- Tap Analyze with Stuff Scout
- Scout analyzes your existing item photos
- The comparison view appears showing:
- Confidence badge — How confident Scout is in the identification
- Field-by-field comparison — Your current values vs Scout's findings
- "NEW" badges — Fields Scout discovered that you don't have
Selecting What to Apply
- Each field shows radio buttons with three choices:
- Keep current — Use your existing value
- Use Scout's finding — Apply what Scout discovered
- Enter custom — Type your own value
- Fields where Scout found new information default to "Use Scout's finding"
- Fields where you already have data default to "Keep current"
- NEW badges highlight fields Scout discovered that you don't have
- Tap Apply Changes to update your form
- A confirmation shows exactly which fields were updated
| Scout Field | Updates |
|---|---|
| Identification | Product Name |
| Maker | Manufacturer |
| Value | Price |
| Era | Appended to Notes |
| Country of Origin | Appended to Notes |
| Condition | Condition field |
| Materials | Appended to Notes |
| Markings | Appended to Notes |
| About | Appended to Notes |
Viewing Scout Results from Item Detail
Items added to your inventory via Stuff Scout retain a link to the original analysis. You can view the full Scout results at any time without re-scanning:
- Open any item in Item Detail
- If the item was added via Stuff Scout, you'll see a Stuff Scout section
- Tap View Scout Results to see the original analysis
- The full results appear, including:
- Identification and confidence level
- Value estimates and recent sales data
- Historical context and provenance
- Collector notes and market demand
Clickable Source Links
When Scout estimates value, the Recent Sales section now includes clickable marketplace links:
- In Scout results, scroll to Recent Sales
- Each sale shows the platform (eBay, Etsy, etc.)
- Tap the platform name to open the listing (if available)
- Verify Scout's sources and explore comparable sales
Browsing Your Items
Accessing My Items
iPhone Tap My Items in the bottom tab bar
iPad/Mac Click My Items in the sidebar
Understanding the Item List
Each item row shows:
- Photo thumbnail — Item image (or category icon if no photo)
- Item name — In bold
- Manufacturer — Below the name
- Warranty status badge:
- Active Warranty currently valid
- Warning Expiring within 30 days
- Expired No longer covered
- Lifetime Lifetime warranty
- Days remaining — Until warranty expires
Item Detail: Tappable "—" Placeholders
When you open an item, reference rows (serial number, model number, purchase date, etc.) display their value on the right. If the value is missing, you'll see — instead of a blank row.
Tap the — placeholder to jump directly into editing that field. You don't have to open the full edit form and scroll to find it — the placeholder itself is the entry point.
Filtering Items
- Swipe horizontally at the top to see all filter chips
- Tap a filter to apply it: All, Active, Expiring, Expired, Lifetime, No Warranty, Flagged
- The active filter is highlighted
- Tap again to remove the filter
Flagging Items for Review
Flag items you want to focus on — perfect for batch editing, adding missing details, or creating a “working set” of items to review.
To flag an item:
- Long-press any item in the list
- Tap Flag for Review in the context menu
- An orange flag icon appears on the item
To remove a flag:
- Long-press the flagged item
- Tap Remove Flag
To view only flagged items:
- Tap the Flagged filter in the filter bar
- Choose Flagged Only to see just your flagged items
Use cases:
- Mark items that need photos added
- Flag items missing warranty information
- Create a “to-do” list of items needing attention
- Temporarily group items for a specific task
Sorting Products
- Tap the sort button in the toolbar
- Select: Date Added, Name, Purchase Date, Warranty Expiration, Value
- The list reorders immediately
Searching for Products
- Pull down on the item list to reveal the search bar
- Tap the search field and type your search term
- Stuffolio searches: Product name, Manufacturer, Model number, Serial number, Notes
- Results appear as you type
- Tap a result to view the item
Recent Searches
Stuffolio automatically remembers your recent search terms for quick access.
- Viewing recent searches: Pull down to reveal the search bar. Your recent searches appear below the search field before you start typing
- Using a recent search: Tap any recent search term to instantly repeat that search
- Clearing history: Swipe left on a recent search to remove it from history
Voice Search
Use your device's dictation feature to search for items hands-free.
- Pull down to reveal the search bar
- Tap the microphone button on your keyboard
- Speak your search term clearly
- Tap Done when finished speaking
- Results appear automatically
Note: Voice search requires that keyboard dictation is enabled in your device settings and an internet connection for speech processing.
Filter Presets
Save your frequently-used filter combinations as presets for one-tap access.
Creating a Filter Preset
- Apply your desired filters in the item list
- Tap the filter button in the toolbar
- Tap Save as Preset
- Give your preset a descriptive name (e.g., "Active Apple Products", "Expiring Home Items")
- Tap Save
Using Filter Presets
- Tap the filter button in the toolbar
- Tap Presets
- Select your saved preset from the list
- The filters apply instantly
Managing Presets
- Edit preset name: In the Presets list, tap the preset and select Rename
- Update preset filters: Apply new filters, then select the preset and tap Update
- Delete preset: Swipe left on a preset in the list and tap Delete
- Kitchen appliances with active warranties
- Electronics over $500 in value
- Items purchased in the last 30 days
- All items in a specific location (e.g., "Garage")
Using Quick Actions (Swipe)
Swipe left or right on any item to reveal quick action buttons.
Swipe Left Actions
- Delete (red): Remove the item from your inventory. Requires confirmation
- Archive (gray): Move the item to archive without deleting it. Archived items don't appear in your main list but remain accessible
Swipe Right Actions
- Edit (blue): Open the item editor to modify details
- Log Service (green): Record a maintenance or service event. Opens a form to log maintenance details, service dates, and notes
Using the Context Menu (Long Press)
- Touch and hold any item for 1 second
- Menu appears: Edit, AI Assistant, Duplicate, Copy, Share, Flag for Review/Remove Flag, Delete
- Tap your desired action
Selecting Multiple Products
- Tap Select in the toolbar
- Tap items to select them (checkmarks appear)
- Use toolbar buttons: Delete or Export
- Tap Done when finished
Rating Your Items
Rate items based on your ownership experience to build "decision memory" for future purchases.
Opening the Rating Sheet
- Open any item's detail view
- Scroll to the Your Rating section
- Tap the rating card to open the full rating sheet
Rating a Product
Star Rating (1-5 Stars):
- Tap stars to set your rating
- Tap the same star again to clear
- ⭐ Poor, ⭐⭐ Below Average, ⭐⭐⭐ Average, ⭐⭐⭐⭐ Good, ⭐⭐⭐⭐⭐ Excellent
Would Buy Again:
- Tap Yes (👍) or No (👎)
- This is the key decision for future purchases
Notes:
- Record why you rated it this way
- Examples: "Great value but noisy", "Broke after 2 years"
Rating Prompts
Stuffolio prompts you to rate at meaningful moments:
- Anniversary — 1, 2, 3+ year ownership milestones
- Warranty Expired — When manufacturer coverage ends
- After Repair — Following an RMA or service
- Moving On — When selling or disposing
Viewing Rating Insights
- Go to Insights > Rating Insights
- See aggregated data:
- Average rating across items
- "Would buy again" percentage
- Top and bottom rated brands
- Category performance
Using the AI Product Assistant
The AI Product Assistant has a small, useful job: it organizes what you already own, points at trusted external resources for the product in front of you, and captures the work you do as you do it. It is not a diagnosis, not a substitute for a service call, and not a recommendation to repair or replace.
Opening the AI Assistant
- From an Item: Open any item's detail view, tap AI Assistant
- From My Items List: Swipe right on an item, tap AI Help
- Or long-press an item and select AI Assistant
Choosing a Query Type
| Query | What It Finds |
|---|---|
| Find Manual | Official product manual/user guide |
| Find Warranty Info | Warranty terms, registration page |
| Find Parts | Replacement parts and where to buy |
| Find Supplies | Consumables (filters, bags, batteries) |
| Troubleshoot | An optional symptom field ("Describe what's happening") lets you type what you're seeing in your own words. The assistant restates your words at the top of the result, then lists common problems with source attribution, points at the manufacturer's troubleshooting guide, and surfaces relevant pages from your own item record (manual, warranty status, prior repair entries). It does not name a likely cause for your specific symptom. Leave the field empty for a generic overview of the product's failure modes. |
| Maintenance Tips | Care instructions and schedules |
| How-To Videos | Tutorial videos for using the product |
| DIY Repair Videos | Repair guides and videos |
| Maker Website | Manufacturer's official website |
| Register Product | Product registration page |
| Set up Product | Combined workflow — fetches Maker Website, Register Product, and Find Warranty in parallel as one tile (counts as one search) |
| Current Price | Pricing signal from the marketplace, framed as "not an appraisal" |
Set up Product (Combined Workflow)
The Set up Product tile runs three sub-fetches at once — Maker Website, Register Product, and Find Warranty — and presents the results stacked in one view with a single Save All button. Use it when you've just added a new item and want to fill in the manufacturer website, registration URL, and basic warranty months in one pass.
- Counts as one search against your trial AI Assistant quota.
- Partial failure handling: if one of the three sub-fetches doesn't return useful results, the other two still render normally and you can retry the failed sub-tile individually (which then reads the other two from cache, costing nothing extra).
- Save All commits all three results to your item record in one tap: manufacturer website and support URL, registration URL, and warranty months. You can correct anything in the item editor afterward.
Honesty Envelope (Layer 1)
Every AI Product Assistant response — especially Troubleshoot results — is wrapped in a three-part honesty envelope so you know what you're reading:
- Sources cited: the trusted external resources the answer was assembled from (manufacturer documentation, support pages, or general web search), with attribution.
- Bounded by: what kind of claim the answer is making — product-knowledge orientation, resource retrieval, compatibility lookup against what you own, or warranty phase check.
- What this is not: a one-line disavowal — typically "not a diagnosis for your specific situation" or "not a substitute for a licensed technician." This is the load-bearing line that keeps the assistant honest at the moment of use.
The envelope is most visible on Troubleshoot results because that's the query type where confident-sounding AI does the most damage. When you type a sentence into the optional symptom field, the assistant restates your words at the top of the result before pointing at anything, so you can verify it understood you and so the rest of the response stays anchored to what you actually described. It will describe common failure modes for your product category, but it will not tell you which one is yours. That decision is yours to make, with the manufacturer's guide and (when needed) a real technician.
Getting Help
- Select a query type by tapping it
- The AI searches using your product information
- Wait for results (5-15 seconds)
- Results appear with direct links and relevant information
Using Results
- To open a link: Tap any blue link
- To search again: Scroll to bottom, tap Search Again
- To copy: Touch and hold text, tap Copy
- Save to item: When the AI surfaces URLs (manufacturer website, support page, registration page, manual link, supplies page), a save button appears so you can attach them directly to the item's Resources section without retyping.
Smart Auto-Fill: Save Links to Product
When the AI discovers useful URLs, you can save them directly to your item with one tap. This works for all four URL types the AI surfaces:
- Manufacturer website / support URL — saved from Maker Website results
- Registration URL — saved from Register Product results
- Manual URL — saved, picked, or replaced from Find Manual results
- Supplies URL — saved from Find Supplies results (consumables page)
Saved URLs appear in the item's Resources section. The Resources section only shows up once at least one URL is saved (progressive disclosure).
To save a link:
- Run the relevant query (Maker Website, Register Product, Find Manual, or Find Supplies)
- Tap the save button on the result card
- A confirmation appears and the button shows a checkmark
For Find Manual specifically, if the AI surfaces multiple candidate manual URLs you can pick which one to save or replace a previously saved manual URL.
Response Caching (Offline Access)
AI Product Assistant responses are automatically cached for offline access:
- Automatic caching: Every AI response is saved locally for 30 days
- Offline access: Previously fetched responses work without internet
- Instant loading: Cached results for the same item/query load immediately
- Cache badge: Cached responses show a pinned badge with the original fetch date, so you always know whether you're reading a fresh answer or a stored one.
- Staleness hint: When a cached response is more than a week old, the badge surfaces a "may be stale — tap to refresh" hint. The cached answer still loads instantly; you choose whether to spend a search refreshing it.
Managing the Cache:
- Clear item cache: In item detail, tap Clear AI Cache
- Clear all cache: Go to Settings > Data Management > Clear AI Cache
- Automatic cleanup: Expired entries are pruned automatically on app launch
Response Caching (Offline Access)
AI Product Assistant responses are automatically cached for offline access:
- Automatic caching: Every AI response is saved locally for 30 days
- Offline access: Previously fetched responses work without internet
- Smart updates: If you query the same item/type again, cached results load instantly
- Cache indicator: Cached responses show when they were originally fetched
What's Cached:
- All 10 query types (Find Manual, Troubleshoot, etc.)
- Results are stored per-item, per-query-type
- Provider information and metadata
Managing the Cache:
- Clear item cache: Delete cached responses for a specific item in its detail view
- Clear all cache: Go to Settings > Data Management > Clear AI Cache
- Automatic cleanup: Expired entries (older than 30 days) are pruned automatically
- Ensure Manufacturer and Model Number are filled in
- The more specific your product info, the better the results
- Try different query types for comprehensive information
Managing Warranties
Adding Warranty Information
When adding a new item:
- In the Add Product form, scroll to Warranty section
- Tap Warranty Expiration Date and select the date
- Tap Warranty Type: Standard, Extended, or Lifetime
- Optionally add Warranty Notes
For existing items:
- Open the item, tap Edit
- Scroll to Warranty section, fill in fields
- Tap Save
Viewing Warranty Status
- On the item list: Each item shows a status badge
- On the Dashboard: Needs Attention shows expiring warranties
- In Reports: Go to Insights > Reports > Warranty Report
Setting Warranty Reminders
- Go to Settings > Notifications
- Toggle on Warranty Expiring and Coverage Phase Changes
- Set Advance Notice: 7, 14, or 30 days before
Tip: You'll also receive notifications when coverage phases change (e.g., 30 days before transitioning from Full to Parts Only).
Live Activities / Dynamic Island iOS only
Warranty expiration alerts now appear on Dynamic Island (iPhone 14 Pro and later), providing real-time updates when warranties expire.
How Live Activities Work:
- Transitional alerts: Only appears when a warranty expires TODAY (not days in advance)
- Shows: Item name, time remaining, and category icon
- Dynamic Island: Compact view on iPhone 14 Pro and later
- Auto-dismisses: Automatically removed after warranty expires
How to Enable:
- Go to Settings > Notifications
- Toggle Live Activity ON
- Alerts will appear automatically when warranties expire that day
Coverage Types
Different warranties offer different levels of coverage:
| Type | What's Covered | Example |
|---|---|---|
| Full Coverage | Parts + Labor | Factory warranty on new appliance |
| Parts Only | Replacement parts (you pay labor) | Extended coverage years 2-3 |
| Labor Only | Labor costs (you pay for parts) | Service contracts |
| Limited | Specific components only | Powertrain warranty on vehicles |
To set coverage type: Expand the Coverage Phases section, add a coverage phase, and select the appropriate type.
Coverage Phases (Tiered Warranties)
Many warranties change coverage over time. For example, a 5-year appliance warranty might offer:
- Year 1: Full coverage (parts + labor)
- Years 2-3: Parts only
- Years 4-5: Limited coverage
To add coverage phases:
- Expand the Coverage Phases section (it's a top-level section in the form)
- Tap Add Coverage Phase
- Optionally specify a component name (for component-based warranties)
- Select the coverage type for this phase
- Set the start and end dates
- Optionally add a deductible amount
- Tap Save
- Repeat for additional phases
Note: Coverage phases can be added when creating a new item or when editing an existing item.
The detail view shows your current coverage phase and when the next change occurs.
Component-Based Warranties
Some items have different warranty periods for different components. For example, EGO Power+ tools offer:
- Batteries & Chargers: 3 years full coverage
- Outdoor Equipment: 5 years full coverage
To track component-based warranties:
- Add a coverage phase and enter the component name (e.g., "Battery")
- Set the coverage type and dates for that component
- Add additional phases for other components with different coverage periods
Stuffolio suggests common component names based on your item's category. You can also enter custom component names.
Tracking Deductibles
Record out-of-pocket costs for warranty claims:
- Expand the Coverage Phases section
- When adding or editing a coverage phase, enter the Deductible amount
- For tiered warranties, you can set different deductibles per phase
AppleCare+ and Extended Plans
Stuffolio tracks AppleCare+ coverage with automatic detection and plan-aware incident tracking. Apple sells AppleCare in three shapes today, and each one counts incidents differently — Stuffolio's form asks which one you bought so the remaining-incidents math is honest for your actual plan.
The Three AppleCare Plan Families
When you add AppleCare to an item, you pick the plan family. Each has a different cap shape for accidental damage from handling (ADH):
| Plan family | What it is | ADH cap shape |
|---|---|---|
| Single-Pay (2-year) | The one-time upfront purchase, typically 2 or 3 years of coverage paid all at once. | Lifetime cap of 2 incidents over the whole plan |
| Monthly (Pay-As-You-Go) | The month-to-month subscription that renews until you cancel. | Rolling 24-month cap of 2 incidents |
| AppleCare One | The newer multi-device plan that covers several Apple products under one subscription. | Unlimited (no per-incident cap) |
Theft and Loss claims, where covered, are always tracked on a rolling 12-month window — 2 claims for Single-Pay or Monthly plans with T+L, and 3 claims for AppleCare One (which always includes T+L).
Honest Caveat on Rolling-Window Math
For Monthly plans, the rolling 24-month window math is best-effort: Stuffolio counts the total incidents you've logged but doesn't yet track per-incident timestamps, so the counter is an approximation if you've had a long claim history. For most users on a single Monthly plan, this is honest enough. If you're a heavy claimer with multi-year history, treat the counter as a reminder to check your actual Apple coverage page before assuming an incident is covered.
Automatic AppleCare+ Prompt
When you save a new Apple product (manufacturer contains "Apple"), Stuffolio automatically asks if you'd like to add AppleCare+ coverage. This prompt includes:
- Quick overview of what you can track (coverage dates, incidents, service fees)
- Hints on where to find your AppleCare+ information:
- Settings > General > About > Coverage on your iOS device
- System Settings > General > About on your Mac
- support.apple.com/mysupport (sign in with Apple ID)
- Apple Support app
- Original purchase email from Apple
If you tap Add AppleCare+ Details, Stuffolio automatically pre-fills the company name, sets the provider type, and detects your Apple product type from the product name. You'll be asked to pick the plan family in the form.
AppleCare+ Badge
Products with AppleCare+ coverage display a distinctive blue Care+ badge:
- In your My Items list — quickly see which devices have AppleCare
- In the item detail header — immediately visible when viewing an item
The badge shows as blue when coverage is active, or gray when expired.
AppleCare+ Details
Track your AppleCare+ plan details including:
- Plan Family: Single-Pay (2-year), Monthly (Pay-As-You-Go), or AppleCare One
- Theft & Loss: Whether your Single-Pay or Monthly plan includes T+L coverage (AppleCare One always includes it)
- Apple Product: iPhone, iPad, Mac, Apple Watch, AirPods, Apple TV/HomePod, Display
- Incident Tracking: Screen repairs, other damage, and theft/loss claims used — counted against your plan's actual cap shape
- Service Fee Reference: Current fees based on your product type
Tip: You can also add AppleCare+ manually by entering "AppleCare" in the company name field of the Extended Warranty form. Existing AppleCare entries from before Build 35 (when the plan-family picker was added) keep their original math until you open them and pick a plan family.
Quick Edit from Dashboard
You can also open AppleCare+ Tracking directly from the Dashboard. If you only have one Apple product, Stuffolio skips the picker and opens the editor right away — no need to navigate to the product first. Update incidents used, service fees, and coverage dates in just a few taps.
Using the Warranty Manager
- Go to Tools > Own > Warranty Manager
- View tabs: Active, Expiring, Expired
- Tap any item to view details
RMA & Warranty Claim Tracking
Track warranty claims and returns from start to finish with RMA (Return Merchandise Authorization) tracking.
Starting an RMA
- Open the item you're claiming
- Scroll to Warranty section
- Tap Track RMA/Claim
- Enter claim details:
- RMA Number: The authorization number from the manufacturer
- Claim Date: When you filed the claim
- Issue Description: What's wrong with the item
- Status: Pending, Approved, Shipped, In Progress, Completed
- Tap Save
Tracking Shipping
- Outbound tracking: Enter the tracking number when you ship the item
- Return tracking: Add the tracking number for the replacement/repair
- Tap tracking numbers to open carrier websites
Claim Timeline
View the full history of your claim including status changes, dates, and notes. This creates a record for future reference if issues arise.
Customer Support Interaction Logging
Never start from scratch on your third call to customer service. Log every support interaction with details you'll need later.
Logging a Support Interaction
- Open the product
- Scroll to Support History section
- Tap Log Interaction
- Enter details:
- Date & Time: When you contacted them
- Contact Method: Phone, Email, Chat, In-Person
- Rep Name: Who you spoke with
- Case/Ticket Number: Reference number for the interaction
- Notes: What they said, what was promised
- Follow-up Date: When to call back if needed
- Resolution: How the issue was resolved (if applicable)
- Tap Save
Viewing Support History
All logged interactions appear in chronological order. Tap any entry to view full details or edit.
Scheduling Maintenance
Adding a Maintenance Schedule
- Open an item's detail view
- Tap Edit
- Scroll to Maintenance section
- Tap Add Maintenance Task
- Fill in:
- Task Name (e.g., "Replace filter")
- Frequency: One-time, Weekly, Monthly, Quarterly, Annually
- Next Due Date
- Notes
- Tap Save
Completing a Maintenance Task
- Open the product
- Scroll to Maintenance section
- Tap Mark Complete
- The next due date calculates automatically for recurring tasks
Smart Maintenance Suggestions
Get automatic maintenance recommendations based on item category.
Viewing Suggestions
- Open an item's detail view
- Scroll to Maintenance section
- Tap Get Suggestions
- Review suggested tasks with:
- Task name and frequency
- Instructions and tips
- DIY difficulty (Easy, Moderate, Professional)
- Estimated cost range
Adding Suggested Tasks
- Tap Add next to any task
- Or tap Add All to add all suggestions
- Adjust the first due date if needed
- Tasks appear in your maintenance schedule
Suggestion Categories
| Category | Example Suggestions |
|---|---|
| Appliances | Clean filters, descale, check seals |
| Electronics | Clean vents, update software |
| Automotive | Oil change, tire rotation |
| HVAC | Replace filters, check refrigerant |
| Outdoor | Seasonal prep, winterization |
Price Watch
Price Watch passively monitors the asking-price signal for items you've marked, so you notice if something you own has drifted significantly in value (up or down) without you having to remember to look. It's quiet by design — no notifications spam, no constant refreshes.
Enabling Price Watch on an Item
- Open the item
- Scroll to the Price Watch section in the item detail
- Tap Enable Price Watch
- Stuffolio uses the model number and category to set up the watch
Once enabled, the item participates in the background refresh schedule. You don't need to do anything else.
What the Chart Shows
The Price Watch section on the item detail displays:
- Price history chart — points over time showing the asking-price signal trajectory
- Current vs. original purchase price — how the current market signal compares to what you paid
- Last refresh date — when the most recent data point was collected
How Refresh Works
Price Watch refreshes on a schedule designed to be cheap and respectful, with platform-specific mechanics:
- iPhone / iPad Background refresh runs when iOS decides it's a good time — typically while charging on Wi-Fi. You don't have to schedule it.
- Mac Refresh runs on a timer while Stuffolio is open. Keep Stuffolio running in the background for the most up-to-date data points.
- Tier-by-price cadence: Higher-value items refresh more often than low-value ones, so the AI cost stays bounded.
- Monthly cap: Each item's refresh count is capped per month, regardless of how long it's been watched. This prevents runaway costs on long-watched items.
- Subscriber-gated: Price Watch is one of the AI-backed features and is included with the optional subscription. Without a subscription, it draws on your free AI allowance, so it's best suited to a small number of items.
Kill Switch
Price Watch has a global kill switch in Settings → Price Watch. Use it to pause all watches temporarily without losing per-item configuration — useful if you're traveling, on metered cellular, or just want to stop background activity for a stretch. Resume from the same setting; watches pick up where they left off.
Manual Refresh
If you want a fresh data point right now (e.g., before selling an item), pull-to-refresh the Price Watch section on the item detail. This counts against the item's monthly refresh budget.
Back to ContentsTracking Loans (Borrowed & Lent)
Track items you've lent to other people and items you've borrowed — who has what, when it's due back, and whether it's overdue.
Entry Points
- iPhone Home tab → Maintain → Borrowed & Lent — Surfaced alongside warranties, maintenance, and recalls. Tap to open the full Borrowed & Lent view.
- iPhone / iPad Actions → Own → Loan Tracker — Full list of all active loans, sortable by due date or borrower.
- iPad & Mac Dashboard — The "Needs Attention" card surfaces any loan past its expected return date.
Recording a Loan (You're Lending Something Out)
- Open the item you're lending
- Tap Edit
- Scroll to Loans section
- Tap Record Loan
- Fill in: Borrower Name, Date Loaned, Expected Return Date, Notes
- Tap Save
Viewing Active Loans
- Home tab (iPhone): Under Maintain, the Borrowed & Lent entry shows a count of active loans and flags anything overdue.
- Dashboard (iPad & Mac): Needs Attention shows items due to be returned.
- Loan Tracker: Go to Actions > Own > Loan Tracker for the full sortable list.
Marking a Loan as Returned
- Open the loaned item
- Scroll to Loans section
- Tap Mark Returned
The loan moves to history on the item's detail view. You can see the full lending history for each item.
Back to ContentsChecking for Recalls
Performing a Recall Check
- Go to Insights > Recall Check
- Tap Check All Products
- Wait for results from the CPSC database
Stuffolio automatically searches for recalls matching items in your inventory based on item names and manufacturers.
Viewing Recall Results
If matches are found, tap any recall to expand details including:
- Hazard — What the danger is
- Remedy — What to do (refund, repair, replacement)
- Units Affected — How many units were recalled
- More Information — Link to official CPSC page
Tips for Better Results
- Use actual product names (e.g., "Ozark Trail Tabletop Butane Stove")
- Include manufacturer/brand names
- Add model numbers when available
- Tap Learn more in the app for detailed information
Important Notes
We use public CPSC data to help surface possible recalls. For complete and official information, always check cpsc.gov.
Recalls from FDA (food/medical) and NHTSA (vehicles) aren't included yet. Think of this as a helpful heads-up, not a replacement for official safety resources.
Back to ContentsRepair, Keep, or Replace?
A thinking tool that helps you make intentional decisions about your items. It surfaces repair options first and uses your own data — not shopping funnels — to guide recommendations.
Opening the Tool
iPhone Open an item, tap Tools, then Repair, Keep, or Replace?
iPad/Mac Open an item, go to Tools > Decisions > Repair, Keep, or Replace?
You can also find it via Go To (⌘K) by searching "repair" or "replace".
What It Analyzes
The tool examines five areas using data already in your inventory:
- Repair Options — Repairability score by product category, estimated repair cost vs. replacement cost, links to DIY guides and parts via the AI Product Assistant
- Timing Analysis — How old the item is relative to its expected lifespan, warranty status, and maintenance history
- Cost Comparison — Repair cost vs. replacement cost based on your item's purchase price and current market value
- Brand Intelligence — Your personal history with the brand — average ratings, "would buy again" rate, and number of repairs across all your items from that manufacturer
- AI Alternative Products — Fetches alternative product recommendations inline with source attribution from trusted review sites. Counts as one Repair-Keep-Replace "look" against your free allowance (5 to start, no time limit, then 1 free per month); unlimited with a subscription.
Finding Alternative Products
Tap Find Alternatives with AI to search for replacement options directly in the decision view:
- An animated progress indicator shows the search phases: searching, comparing, checking reviews, preparing recommendations
- Results appear inline with product name, manufacturer, estimated price, key features, and reasoning
- Each recommendation includes source attribution (e.g., Wirecutter, RTINGS, Reddit) with credibility tiers
- Tap Ask More Questions to open the full AI Product Assistant for deeper research
Alternatives are routed by category, not flattened to a generic shopping list:
- Same-ecosystem first for ecosystem-coherent items. A MacBook owner sees Apple alternatives before cross-platform options; cross-ecosystem alternatives appear second and are clearly labeled as such. The AI never assumes you want to switch platforms because you own one.
- Specialists, not products for heirlooms, fashion, and luxury items. Replace doesn't make sense for a vintage instrument or a designer bag; the advisor surfaces repair specialists instead.
- Grading and restoration impact for collectibles. The advisor flags that restoration often reduces value, rather than recommending it.
- Budget-bracketed options for commodity items (toasters, microwaves). Ecosystem doesn't apply; price tier does.
- Durability and parts focus for tools and appliances. Cross-brand alternatives are normal here.
If the AI is uncertain about your specific model, it surfaces that uncertainty in a visible notes card — not buried at the bottom of the results.
Behavior by Item Type
Not every item is a candidate for "replace." A grandfather clock doesn't have alternatives in the way a laptop does; a Birkin bag doesn't either. The advisor routes by item category so the recommendation matches what kind of thing you own:
| Category | What you'll see |
|---|---|
| Consumer electronics (laptops, phones, vacuums, TVs) | Same-ecosystem alternatives first; cross-ecosystem options clearly labeled and shown second |
| Heirloom & sentimental (clocks, jewelry, art, instruments) | Repair specialists and restoration cost guidance. Replace branch hidden |
| Collectibles (coins, stamps, sports memorabilia) | Grading and restoration-impact guidance instead of generic alternatives |
| Fashion & luxury (designer bags, watches, shoes) | Repair specialist directory. Replace branch hidden by default |
| Commodity replacement (toasters, microwaves, basic tools) | Budget- and size-bracketed options; ecosystem doesn't apply |
| Tools & appliances (drills, mixers, lawnmowers) | Cross-brand alternatives with focus on durability and parts availability |
| Other (books, photos, kitchen utensils) | The Keep, Repair, Replace Advisor isn't shown for these categories |
The Recommendation
Based on all available data, the tool suggests one of four paths:
- Repair It — The item is worth fixing. Links to repair resources
- Keep Using — The item still has useful life. No action needed
- Replace with Same — Buy the same item again (high brand satisfaction)
- Try an Alternative — Consider a different product (low brand satisfaction or better options available)
Each recommendation shows a confidence level based on how much data is available. More complete item records (purchase price, warranty dates, ratings, maintenance history) produce higher-confidence recommendations.
💡 Tip: The tool has a "repair-first" philosophy — it starts with a bias toward repairing rather than replacing. This keeps your inventory useful longer and reduces waste.
Exporting Your Data
Exporting All Products
- Go to Settings > Data > Export
- Choose format: CSV, PDF, or Excel
- Tap Export All Products
- Share via AirDrop, Mail, Files, etc.
Exporting Selected Products
- Go to My Items, tap Select
- Tap items to select them
- Tap Export in the toolbar
Generating Donation Tax Reports
Create documentation for charitable contributions:
- Mark items as Donated when disposing of them (include recipient organization and date)
- Go to Tools > Gone > Donation Report
- Select the tax year
- Review the list of donated items with their fair market values
- Tap Generate Report to create a PDF
The report includes item descriptions, donation dates, recipient organizations, and estimated values — ready for your tax records.
Importing Items
Preparing Your CSV File
Your CSV needs: a header row, one item per row, and at minimum a name or title column.
Supported columns: name, manufacturer, model, serial, category, location, purchase_date, purchase_price, warranty_expiration, notes
Importing the File
- Go to Settings > Data > Import
- Tap Select File and choose your CSV
- Map columns to Stuffolio fields
- Preview and tap Import
Reviewing Data Quality
Keep your inventory complete and organized with the Data Review feature.
Accessing Data Review
iPhone/iPad
- Go to Settings > Data Management
- Scroll to the Data Quality section
- Tap Review Items
Mac
- Go to Settings in the sidebar (or press ⌘,)
- Click Data Management
- Scroll to the Data Quality section
- Click Review Items
What Data Review Shows
Items Without Photos:
- Products that don't have any photos attached
- Tap/click an item to open it and add photos
- Items are sorted by most recent first
Potential Duplicates:
- Products with the same title and manufacturer
- Grouped together for easy comparison
- Tap/click any item to view details and verify
Using Data Review
To add photos to an item:
- Tap/click the item row (anywhere except the OK button)
- The item detail view opens
- Tap/click Add Image to attach photos
- Navigate back to continue reviewing
To dismiss an item from future reviews:
- Tap/click the OK button next to the item
- The item is marked as reviewed
- It won't appear in future Data Reviews
To reset dismissed items:
- Scroll to the bottom of Data Review
- Find "X items reviewed and hidden"
- Tap/click Show Again
- Confirm to reset all dismissed items
Tips
- Review your data periodically to keep it complete
- Adding photos helps with insurance claims and identification
- Dismissing an item doesn't delete it — just hides it from the review list
Value Tracking & Depreciation
Monitor how your inventory's value changes over time with Value Snapshots and the Depreciation Calculator.
Value Snapshots
Value Snapshots automatically capture your total inventory value over time, creating a historical record for trend analysis and insurance purposes.
How Value Snapshots Work
- Automatic Snapshots: Stuffolio periodically captures your total inventory value
- Manual Snapshots: Capture current value on demand (before/after major purchases)
- Trend Charts: Visualize how your inventory value changes over weeks, months, or years
Taking a Manual Snapshot
- Go to Insights > Value History
- Tap Capture Snapshot
- Optionally add a note (e.g., "Before downsizing" or "After holiday purchases")
- Tap Save
Viewing Value Trends
- Go to Insights > Value History
- View the trend chart showing value over time
- Tap data points to see snapshot details
- Change time range: Week, Month, Year, All Time
Depreciation Calculator
Estimate what your items are worth today based on their age and depreciation method.
Depreciation Methods
| Method | Description | Best For |
|---|---|---|
| Straight-line | Equal depreciation each year | Appliances, furniture |
| Declining balance | Faster initial depreciation | Electronics, computers |
| Custom rate | Your own annual percentage | Special situations |
Setting Depreciation
- Open an item's detail view
- Tap Edit
- Scroll to Value section
- Set Depreciation Method
- For custom rates, enter the annual percentage
- View Estimated Current Value
Insurance Profile & Claim Prep
Understand how your belongings fit with your insurance coverage and prepare for claims before they happen.
Setting Up Your Insurance Profile
- Go to Settings > Insurance Profile
- Enter your coverage details:
- Total Coverage Limit: Maximum your policy will pay
- Per-Item Limit: Maximum for any single item (often $1,500-$2,500)
- Deductible: Your out-of-pocket cost per claim
- Tap Save
You can also set an Insured Value per item to track exactly what each item is covered for.
Identifying Coverage Gaps
Once your profile is set, Stuffolio identifies potential issues:
- High-Value Items: Items exceeding your per-item limit that may need riders
- Coverage Gaps: Categories that might need additional coverage
- Total vs. Limit: If your inventory exceeds total coverage
- Stale Replacement Costs: Alerts when replacement cost is inferred from an old purchase price (see below)
Stale Replacement Cost Warnings
Stuffolio calculates each item's replacement cost for insurance purposes. If you haven't entered an explicit replacement cost, Stuffolio falls back to the purchase price. That fallback is fine for recent items — but a 5-year-old TV's purchase price isn't what it would actually cost to replace today.
When the warning triggers: You'll see a stale-cost alert on any item that (a) has no explicit replacement cost set and (b) was purchased more than 2 years ago. The warning appears on the item detail view and in Coverage Insights.
How to clear the warning:
- Open the affected item
- Tap Edit
- Scroll to the Replacement Cost field
- Enter today's cost to replace the item (check current marketplace prices, or use Stuff Scout to get a valuation)
- Tap Save
Viewing Your Insurance Analysis
- Go to Insights > Insurance
- Review the coverage summary
- See flagged items that need attention
- Export the high-value items list for your insurance agent
Claim Prep Kit
When disaster strikes, the Claim Prep Kit gathers everything you need for an insurance claim.
Creating a Claim Package
- Open the affected item(s)
- Tap Actions > Prepare Claim
- Review the gathered information:
- All photos of the item
- Receipt and proof of purchase
- Purchase date and price
- Serial number and model number
- Current estimated value
- Warranty coverage details
- Add claim-specific details:
- Date of loss
- Description of damage/loss
- Police report number (if applicable)
- Tap Generate Package
- Share via email, save as PDF, or AirDrop to your computer
Audit Mode
Verify that your physical inventory matches your digital records with a room-by-room walkthrough.
When to Use Audit Mode
- Annual inventory verification
- After moving to a new home
- When something seems missing
- Before renewing insurance policies
- Estate inventory verification
Starting an Audit
- Go to Tools > Verify Inventory
- Tap Start New Audit
- Optionally filter by location to audit one room at a time
- Tap Begin
Conducting the Audit
- Walk through your space with your device
- As you find each item, tap Found next to it in the list
- Use the search bar to quickly find specific items
- Items you've verified move to the "Found" section
- Continue until you've checked your entire space
Reviewing Audit Results
When you finish (or pause) the audit:
- Found Items: Items you verified are where they should be
- Not Found: Items that weren't accounted for
- Audit Summary: Statistics and discrepancies
Handling Missing Items
For items marked "Not Found":
- Update Location: If you found it somewhere else
- Mark as Lost: If you can't locate it
- Mark as Stolen: If you suspect theft
- Delete: If the item no longer exists
Duplicate Finder
Find and merge items that may have been accidentally added twice.
How Duplicates Happen
- Adding an item, forgetting about it, and adding it again later
- Importing from a CSV that overlaps with existing items
- Multiple family members adding the same item
- Using Stuff Scout on an item that was already in inventory
Running the Duplicate Finder
- Go to Tools > Duplicate Finder
- Tap Scan Inventory
- Wait for the scan to complete
- Review potential duplicates grouped together
What Duplicate Finder Checks
- Matching or very similar names
- Identical serial numbers
- Same model number from same manufacturer
- Matching barcodes (UPC/EAN)
Resolving Duplicates
Compare Side-by-Side
Tap any duplicate pair to see both items compared field-by-field. This helps you decide which to keep.
Merge Duplicates
- Select the pair you want to merge
- Tap Merge
- Choose which item to keep as the primary
- Select which fields to use from each item
- Tap Merge Items
Merging combines the best data from both entries into one comprehensive record.
Delete Duplicate
- If one entry is clearly wrong, tap Delete on that item
- Confirm deletion
Not a Duplicate
If two items look similar but are actually different (e.g., two of the same TV in different rooms), tap Not a Duplicate to dismiss the pair from future scans.
Back to ContentsData Cleanup
Find and fix incomplete records in your inventory with automated analysis and guided fixes.
Running Data Cleanup
- Go to Tools > Clean Up Records
- Wait while your inventory is analyzed
- Review the completeness score and issue categories
Issue Categories
- Missing Photos — Items without any photos attached
- Missing Price — Items without a purchase price
- Missing Category — Items not assigned to any category
- Missing Manufacturer — Items without manufacturer specified
- Expired Warranties — Items with warranties that have expired
- Large Photos — Photos over 1MB that could be optimized
- Missing Serial Number — High-value items without serial numbers
Fixing Issues
- Tap any category card to see affected items
- Tap an item to open it for editing
- Add the missing information
- Tap Refresh Analysis to update the report
Batch Categorize
Automatically assign categories to uncategorized items using smart keyword matching.
Running Batch Categorize
- Go to Tools > Batch Categorize
- View the list of uncategorized items with suggested categories
- Review suggestions — each shows a confidence-based category match
How Suggestions Work
The system analyzes item names and manufacturers against keyword databases for each category. For example, "KitchenAid mixer" matches "Small Appliances" due to both brand and product keywords.
Applying Categories
- Use Select All to include all items, or tap individual checkboxes
- To change a suggestion, tap the ••• menu and choose a different category
- Tap Apply Categories to save all changes at once
Bulk Price Update
Update current values for multiple items at once using various calculation methods.
Opening Bulk Price Update
- Go to Tools > Bulk Price Update
- Select which items to update
- Choose an update strategy
- Preview and apply changes
Selection Modes
- All Items — Update your entire inventory
- By Category — Update only items in a specific category
- By Room — Update only items in a specific location
- Items with Price — Only items that have a purchase price recorded
- Missing Current Value — Only items without a current value set
Update Strategies
- Set Specific Value — Apply the same dollar amount to all selected items
- % of Purchase Price — Calculate as a percentage (e.g., 80%) of the original price
- Apply Depreciation — Use category-based depreciation rates based on item age
- Clear All Values — Remove current values from selected items
Preview Before Applying
Tap Preview Changes to see exactly what will change before committing. The preview shows:
- Current total value vs. new total value
- Individual item changes (first 5 items)
- Overall value difference
Disposing of Items
When you no longer own an item, mark it as disposed to keep your inventory accurate while maintaining a record.
Disposal Methods
| Method | Description | Records Kept |
|---|---|---|
| Sold | Item was sold | Sale price, buyer, date |
| Donated | Given to charity | Organization, date, value (for tax) |
| Gifted | Given to friend/family | Recipient, date |
| Recycled | Properly recycled | Date, facility (optional) |
| Returned | Returned to store | Refund amount, date |
| Trashed | Thrown away | Date |
| Lost | Item is missing | Date, circumstances, insurance claim |
| Stolen | Item was stolen | Date, circumstances, police report, insurance |
Disposing of an Item
- Open the item's detail view
- Tap the action menu (•••)
- Select Dispose of Item
- Choose the disposal method
- Fill in the relevant details
- Tap Confirm
Donations: IRS Threshold Prompts
When you mark an item as Donated, Stuffolio prompts you to enter a Fair Market Value (FMV) — the price the item would sell for between a willing buyer and willing seller on the donation date. FMV is what you'll use on your tax return, not the original purchase price.
The donation sheet gives you contextual guidance based on the value:
- Under $500: Standard donation record — organization name, date, FMV, and optional receipt photo are enough for most filings.
- $500 – $5,000: IRS Form 8283 Section A territory. Stuffolio flags that you'll need to file this form if your total non-cash donations exceed $500 for the year, and reminds you to save the receipt.
- Over $5,000: IRS Form 8283 Section B territory. A qualified written appraisal is typically required. Stuffolio notes this in the donation record and encourages you to attach the appraisal document.
Marking Items as Lost
For items that have gone missing:
- Select Lost as the disposal method
- Enter the date you noticed it missing
- Describe the circumstances
- If filing an insurance claim, add claim details
Lost items remain searchable in your archive. If found later, you can restore them to active inventory.
Marking Items as Stolen
For items that were stolen:
- Select Stolen as the disposal method
- Enter the date of theft
- Describe the circumstances
- Add the Police Report Number
- Track insurance claim status
Viewing Disposed Items
- Go to My Items
- Tap the Archive tab or filter
- View all disposed items with their disposal details
Restoring a Disposed Item
If you marked something as disposed by mistake, or a lost item was found:
- Find the item in the Archive
- Open it and tap Restore to Inventory
- The item returns to your active inventory
Using iCloud Sync
Enabling iCloud Sync
- Go to Settings > Data
- Toggle iCloud Sync on
Note: Use the same Apple ID on all devices for sync to work.
How Sync Works
- Automatic — Changes sync in the background
- Near-instant — Usually syncs within seconds
- Conflict resolution — When two people edit the same item at once, Stuffolio surfaces both versions side-by-side so you can pick Keep Local, Keep Remote, Merge, or Keep Both. The same side-by-side review path covers cross-zone conflicts on items shared inside a household, so you won't lose the other person's work to a silent overwrite.
Offline Mode and Auto-Sync
Stuffolio works seamlessly even when you don't have an internet connection. All your changes are automatically queued and synced when connectivity returns.
How Offline Mode Works
- Full offline functionality — Add, edit, and delete items without an internet connection
- Automatic queuing — Changes made offline are saved locally and queued for sync
- Auto-sync on reconnection — When your device regains connectivity, pending changes sync automatically in the background
- No manual intervention — You don't need to trigger sync manually after going back online
- Transparent operation — The app works the same way whether you're online or offline
What Happens When You Go Offline
- You lose internet connectivity (airplane mode, no Wi-Fi, cellular data off)
- Continue using Stuffolio normally - add, edit, or delete items
- All changes are saved locally on your device
- Changes are added to a sync queue automatically
What Happens When You Go Back Online
- Your device regains internet connectivity
- Stuffolio automatically detects the connection
- Pending changes in the queue sync to iCloud in the background
- Your data becomes available on all your other devices
- No action required from you
Sync Status Indicators
- Syncing — A subtle indicator shows when changes are being uploaded
- Offline — You may see an offline indicator when not connected
- Sync Complete — No indicator means all changes are synced
Tip: Offline mode is perfect for situations like basements, airplanes, or areas with poor connectivity. Just keep using the app normally, and everything will sync automatically when you're back online.
Back to ContentsFamily/Household Sharing
Share your inventory with family members using CloudKit sharing.
Permission Levels
| Level | Can View | Can Edit | Can Manage Members |
|---|---|---|---|
| Viewer | ✓ | — | — |
| Editor | ✓ | ✓ | — |
| Admin | ✓ | ✓ | ✓ |
Creating a Household
- Go to Settings > Family Sharing
- Tap Create Household
- Enter a household name
- Tap Create
- You become the owner with admin permissions
Inviting Members
- Go to Settings > Family Sharing
- Tap Invite Member
- Enter their iCloud email
- Select permission level
- Tap Send Invitation
Sharing Items
To share an item:
- Open item detail view
- Scroll to Sharing section
- Toggle Share with Household on
To view shared items:
- Go to My Items
- Filter by Shared
- Look for the 👥 sharing icon
Managing Members
- Go to Settings > Family Sharing
- Tap a member to:
- Change their permission level
- Remove them from the household
Leaving a Household
- Go to Settings > Family Sharing
- Tap Leave Household
- Confirm your decision
Apple Integration Features
Stuffolio integrates deeply with Apple's ecosystem to help you work faster and access your inventory from anywhere on your device.
Spotlight Search
Search your inventory directly from your device's home screen or Spotlight.
- How it works: Your items are indexed automatically in Spotlight
- To search: Swipe down on your home screen and type an item name
- Results: Tap a result to open directly in Stuffolio
Example: Type "vacuum" in Spotlight to find your Dyson without opening the app.
Handoff
Start working on one device, continue on another.
- How it works: When viewing an item on iPhone, pick up your iPad or Mac to continue
- Where to find it: Look for the Stuffolio icon in your Dock (Mac) or app switcher (iOS)
- Requirements: Same Apple ID, Bluetooth and Wi-Fi enabled, Handoff enabled in Settings
Interactive Widgets
Access your inventory from your Lock Screen or Home Screen without opening the app.
Available Widgets
| Widget | Sizes | What It Shows |
|---|---|---|
| Quick Add | Small, Medium | Tap to add a new item instantly |
| Expiring Soon | Small, Medium, Large | Warranties expiring in the next 30 days |
| Recent Items | Medium, Large | Your most recently added items |
| Inventory Stats | Small | Total items and value at a glance |
Adding Widgets
- Long-press on your Home Screen
- Tap the + button in the top corner
- Search for "Stuffolio"
- Choose a widget and tap Add Widget
Focus Filters
Automatically show or hide items based on your current Focus mode.
- Work Focus: Show only work-related equipment
- Personal Focus: Hide work items, show home inventory
- How to set up: Settings > Focus > [Your Focus] > Add Filter > Stuffolio
Siri Shortcuts
Use voice commands and automations to interact with your inventory. Stuffolio offers 10+ shortcuts for power users.
Built-in Voice Commands
- "Hey Siri, add item to Stuffolio"
- "Hey Siri, show my expiring warranties"
- "Hey Siri, open Stuff Scout"
- "Hey Siri, what's my inventory worth?"
- "Hey Siri, show maintenance due in Stuffolio"
- "Hey Siri, show my electronics in Stuffolio"
Advanced Automation Actions
These actions are available in the Shortcuts app for building custom automations:
- Add Item to Location — Quickly add items with a pre-filled location
- Get Items by Location — List all items in a specific room or area
- Get Items by Category — Filter your inventory by category
- Get Total Inventory Value — Calculate total value (all items or by category)
- Get Maintenance Due — Show upcoming and overdue maintenance
- Get Expiring Warranties — List warranties expiring within X days
- Export Category as PDF — Generate a PDF report for a specific category
Creating Custom Shortcuts
- Open the Shortcuts app
- Tap + to create a new shortcut
- Search for "Stuffolio" actions
- Add actions like "Add Item to Location" or "Get Inventory Value"
- Name your shortcut and save
Automation Ideas
- Morning briefing: "Get expiring warranties" + "Get maintenance due" as part of a daily summary
- Moving prep: "Get items by location" for each room to generate packing lists
- Insurance update: "Get total inventory value" monthly to track coverage needs
Haptic Feedback
Stuffolio uses haptic feedback throughout the app to provide tactile confirmation of your actions.
When You'll Feel Haptics
| Action | Feedback Type | Description |
|---|---|---|
| Successful scan | Success vibration | Confirms barcode or QR code was detected |
| Selecting items | Light tap | Gentle feedback when tapping items or list rows |
| Errors or duplicates | Warning vibration | Alert for duplicate items or scan errors |
| Completing tasks | Success vibration | Confirms saved changes or completed actions |
| Swipe actions | Light tap | Tactile feedback when revealing swipe action buttons |
Adjusting Haptic Feedback
Haptic intensity follows your device's system settings:
- To adjust: Go to iOS/iPadOS Settings > Sounds & Haptics > System Haptics
- To disable: Turn off System Haptics in your device settings. This will disable haptics system-wide
Note: Haptic feedback is available on iPhone 7 and later, and iPad Pro models with haptic capability. Mac trackpads provide similar force touch feedback where supported.
Accessibility Features
Stuffolio is designed to be accessible to all users, with enhanced support for assistive technologies.
VoiceOver Support
Stuffolio provides comprehensive VoiceOver labels that announce complete item information with a single tap.
What VoiceOver Announces
When you select an item with VoiceOver enabled, you'll hear a single combined announcement that includes:
- Product name — The name of the item
- Manufacturer — Who made the item
- Category — What type of item it is
- Warranty status — Current warranty state (active, expiring, expired, or lifetime)
Example announcement: "MacBook Pro, Apple, Electronics, Warranty Active"
VoiceOver Navigation Tips
- Swipe right/left: Navigate between items in the list
- Double-tap: Open the selected item's detail view
- Two-finger swipe down: Read all items from current position
- Rotor gestures: Use the rotor to navigate by headings, buttons, or custom actions
Additional Accessibility Support
- Colorblind-friendly icons: Categories, conditions, and statuses use distinct colors that are easy to tell apart, even for users with color vision differences
- Dynamic Type: All text scales with your system font size preferences
- High Contrast: Honors system high contrast settings for better visibility
- Reduce Motion: Animations are reduced when Reduce Motion is enabled
- Voice Control: All interface elements are labeled for Voice Control navigation
- Switch Control: Full support for switch-based navigation
Configuring Accessibility
Accessibility features are configured in your device's system settings:
- Open Settings on your device
- Go to Accessibility
- Enable the features you need: VoiceOver, Zoom, Display & Text Size, etc.
- Stuffolio automatically adapts to your accessibility preferences
Privacy Controls
All Apple integration features are opt-in. Control them in Settings > Integrations:
- Spotlight Search: Toggle to enable/disable indexing
- Handoff: Toggle to enable/disable continuity
- Siri Shortcuts: Toggle to enable/disable voice commands
- Focus Filters: Configured in System Settings, not Stuffolio
Configuring Settings
Appearance Settings
- Theme: System, Light, or Dark
- App Icon: Choose from available icons (iPhone/iPad only)
Per-View Theme Toggle
For thirteen of the most-used views (item detail, Add Item, Stuff Scout result, AI Assistant result, and several others), a small theme-toggle button appears in the toolbar. Tap it to flip just that view between Light and Dark independently of your global setting — handy when you're reading a photo-heavy item detail outdoors or in a dim room. The toggle also appears on recovery views (failed syncs, cache-restore prompts) so you can always read them legibly regardless of ambient theme conditions.
Notification Settings
- Toggle: Warranty Expiring, Coverage Phase Changes, Maintenance Due, Loan Due
- Advance Notice: 7, 14, or 30 days before
Default Settings
- Default Category: Pre-selected for new items
- Default Location: Pre-filled for new items
- Depreciation Rate: Annual percentage for value calculation
- Currency: Display currency for prices
Camera & Photos Settings (iOS/iPadOS)
Go to Settings > Camera & Photos
- Save to Photo Library: When enabled, photos taken with the camera are automatically saved to your Photo Library in addition to being attached to items
This setting is useful for keeping backup copies of item photos accessible outside of Stuffolio. Photos selected from your existing Photo Library are not duplicated.
Back to ContentsLegacy Wishes
Record who should receive your personal belongings. Legacy Wishes helps you document your preferences for family and loved ones.
Accessing Legacy Settings
Legacy Wishes settings are accessed from within the Legacy Wishes view itself:
- Open Legacy Wishes from the sidebar navigation
- Tap the gear icon (⚙️) in the toolbar
- The Legacy Settings sheet appears
Showing/Hiding Legacy Wishes
To show or hide Legacy Wishes in the sidebar:
- Open Legacy Settings (gear icon in Legacy Wishes)
- Under Visibility, toggle Show Legacy Wishes
- When OFF, Legacy Wishes is hidden from the sidebar navigation
Adding Recipients
Recipients are the people or organizations who may receive your items.
- Open Legacy Wishes from the navigation
- Tap Recipients
- Tap + Add Recipient
- Fill in the details: Name, Relationship, Contact Info (optional), Notes (optional)
- Tap Save
Assigning Items
- Open any item's detail view
- Scroll to the Legacy Wishes section
- Tap Assign This Item
- Select recipient(s) in priority order
- Choose a Fallback Disposition (Donate, Sell, Give Away, etc.)
- Add optional notes
- Tap Save
Browsing Your Wishes with Thumbnails
The Legacy Wishes list shows a thumbnail of each assigned item next to the recipient's name — not just a text label. At a glance you can see what you're giving to whom, which is especially useful when you have a dozen items assigned to the same person or similar items going to different people.
- Items without photos show a category icon in place of a thumbnail
- Tap any row to open that item and review or change the assignment
- Group by recipient to see the complete list of what each person is receiving
Sharing Your Wishes
Export as PDF
- Open Legacy Wishes
- Tap Export
- Select Export as PDF
- Share via Print, Mail, Files, or AirDrop
Share with Family (In-App)
- Open Legacy Wishes
- Tap Share with Family
- Choose permission level: View Only or View & Input
- Send invitations to family members
Receiving Shared Legacy Wishes
When someone shares their Legacy Wishes with you, here's what to expect.
When You Receive a Share Link
- You'll receive an iCloud share link (via Messages, Mail, or another method)
- Tap the link on your iPhone, iPad, or Mac
- If you have Stuffolio installed, it opens automatically
- If not, you'll be prompted to download it from the App Store
- Accept the share invitation when prompted
- The shared wishes appear in Legacy Wishes → Shared with Me
What You'll See
After accepting, you can view the person's Legacy Wishes:
- Header — Shows whose wishes you're viewing and when they were shared
- View Only Banner — Confirms you have read-only access
- Recipients — All the people designated to receive items (names, relationships, item counts)
- Assigned Items — Each item with:
- Item name
- Who it's designated to
- Fallback plan if declined (Donate, Sell, Give Away, etc.)
- Any notes or stories the owner added
- Disclaimer — Reminder that these are wishes, not legal documents
Accessing Shared Wishes Later
- Open Legacy Wishes from the sidebar
- Tap Shared with Me
- Select the person whose wishes you want to view
Real-Time Updates
When the owner updates their wishes, changes sync automatically to your device. You'll always see the most current version of their intentions.
Family Collaboration
When enabled, family members can indicate their preferences on items you've shared.
Enabling Collaboration (For Owners)
- Open Legacy Wishes
- Tap Share with Family
- When sharing, choose permission level View & Input (not View Only)
- Family members with "View & Input" permission can submit preferences
Providing Input (For Recipients)
If the owner has enabled collaboration, you can indicate your preferences:
- Open Legacy Wishes → Shared with Me
- Select the person's wishes
- Tap Family Input
- For each item, indicate your preference:
- Interested — "I would like this item"
- No Preference — Neutral
- Declined — "I don't need this item"
- Optionally add a note explaining your preference
- Tap Submit
Your input is sent to the owner for their consideration. The owner always makes final decisions — family input is advisory only.
Reviewing Family Input (For Owners)
View family input from the Family Input section in Legacy Wishes. You'll see:
- Who has responded
- Their preferences for each item
- Any notes they've added
- Conflicts (when multiple people want the same item)
Legacy Settings Reference
Access settings from the gear icon (⚙️) in the Legacy Wishes toolbar.
Default Disposition
| Setting | Description |
|---|---|
| Default Fallback | What happens to items if all designated recipients decline (Donate, Sell, Give Away, Recycle, Discard, Let Executor Decide) |
Assignment Options
| Setting | Description |
|---|---|
| Advanced Mode | When ON, set priority order when assigning items to multiple recipients |
Visibility
| Setting | Description |
|---|---|
| Show Legacy Wishes | Toggle to show/hide Legacy Wishes in the sidebar navigation |
Reset
| Setting | Description |
|---|---|
| Show Disclaimer Again | Reset the legal disclaimer prompt to show it next time |
Managing Sharing
- View Recipients: See who has access and their permission level
- Change Permissions: Update access levels anytime
- Revoke Access: Remove someone's access to your wishes
Keyboard Shortcuts
Available on iPad with external keyboard and Mac.
Global Shortcuts
| Shortcut | Action |
|---|---|
| ⌘K | Open Go To |
| ⌘N | Add New Product |
| ⌘, | Open Settings |
Navigation Shortcuts
| Shortcut | Action |
|---|---|
| ⌘1 | Dashboard |
| ⌘2 | My Items |
| ⌘3 | Tools |
| ⌘4 | Insights |
| ⌘5 | Stuff Scout |
| ⌘6 | Legacy Wishes |
Using Go To (⌘K)
Go To is Stuffolio's command palette — a quick way to navigate anywhere in the app, launch actions, access tools, and get help without leaving your current screen. Features like Value Calculator, Settings, and Depreciation open directly — you land right where you want to be.
Opening Go To
| Platform | Method |
|---|---|
| Mac | Press ⌘K anywhere, or click Go To in the toolbar |
| iPad | Press ⌘K with keyboard, or tap Go To in toolbar |
| iPhone | Tap the Go To button in the toolbar |
How to Use
- Open Go To using your preferred method
- Start typing to search — results filter instantly
- Use ↑ / ↓ arrow keys to navigate results
- Press Return to select the highlighted item
- Press Escape to close without selecting
Go To Categories
Results are organized into six categories with 27 total commands:
Tools (8 commands)
| Item | Description | Keywords |
|---|---|---|
| Add Item | Create a new item entry | new, create, item |
| Scan Barcode | Add item by scanning UPC/QR code | camera, upc, qr |
| Import from CSV | Import items from spreadsheet | spreadsheet, excel, data |
| Export to CSV | Export items to spreadsheet | spreadsheet, download |
| Export to PDF | Generate PDF inventory report | report, print, document |
| Backup Data | Create a backup of your data | save, archive, protect |
| Restore Data | Restore from a previous backup | recover, undo |
| Bulk Operations | Edit multiple items at once | batch, mass, multiple |
Navigation (6 destinations)
| Item | Description | Keywords |
|---|---|---|
| Dashboard | Overview of your inventory | home, summary, main |
| My Items | Browse and manage your inventory | items, list, browse, stuff |
| Tools | Import, export, and utilities | utilities, scanner, tools |
| Insights | Analytics and reports | analytics, stats, reports |
| Settings | App settings and configuration | preferences, config |
| Legacy Wishes | Record who gets what | inheritance, recipient, estate, will |
Utilities (3 items)
| Item | Description | Keywords |
|---|---|---|
| AI Product Assistant | Get help with items from the AI Assistant | assistant, manual, troubleshoot |
| Check Recalls | Check for item safety recalls | safety, warning, cpsc |
| Verify Inventory | Verify and count your inventory | verify, check, count, audit |
Reports (3 items)
| Item | Description | Keywords |
|---|---|---|
| Inventory Insights | Charts and statistics | analytics, statistics, charts |
| Value Calculator | Calculate total inventory value | worth, money, cost, price |
| Depreciation Tracking | Track asset value over time | decline, assets, accounting |
Help (3 items)
| Item | Description | Keywords |
|---|---|---|
| Getting Started | Learn how to use Stuffolio | guide, tutorial, learn |
| Icon Guide | What the icons and symbols mean | symbols, meaning, legend |
| Filter & Sort Help | How to filter and sort items | organize, find |
Settings (4 items)
| Item | Description | Keywords |
|---|---|---|
| Cloud Sync | iCloud sync configuration | icloud, backup, devices |
| Notifications | Warranty expiration alerts | alerts, reminders, expiring |
| Data Management | Import, export, and reset data | storage, reset, clear |
| About Stuffolio | Version and support info | version, support, contact |
Search Tips
- Type any word — Search matches titles, descriptions, and keywords
- Use abbreviations — "AI" finds AI Product Assistant
- Use synonyms — "inventory" finds My Items
- Partial words work — "back" finds Backup Data and Restore Data
- Action words — "add", "export", "scan" jump to relevant actions
Note: Go To helps you navigate to features, tools, and help within Stuffolio. To search your items, go to My Items where the search bar is always visible.
Back to ContentsTroubleshooting
Products Not Syncing Between Devices
- Check iCloud sync is enabled in Settings > Data
- Verify same iCloud account on all devices
- Check iCloud storage isn't full
- Try toggling sync off, wait 10 seconds, toggle back on
Smart Scanner Not Detecting Barcodes
- Move to well-lit area, avoid shadows
- Hold phone 6-12 inches from barcode
- Ensure barcode isn't damaged or wrinkled
- Clean camera lens
Stuff Scout or AI Assistant Not Responding
- Check internet connection
- Wait 30 seconds and retry
- If rate limited, wait a few minutes
- Force quit and reopen the app
Subscription Says "Not Active" After Network Loss
Stuffolio caches your last-known-good subscription status so brief network drops or App Store outages don't suddenly lock you out of features you paid for. If you see an offline banner ("Subscription status couldn't be verified — using cached status"), your subscription is still active locally. Connect to Wi-Fi or cellular and the banner clears on the next StoreKit sync.
If the banner persists after reconnecting:
- Go to Settings → Subscription Status
- Tap Restore Purchases
- Sign in to your Apple ID if prompted
- Stuffolio re-verifies the subscription with App Store and clears the cached-status banner
Notifications Not Appearing
- Check iOS/Mac notification settings for Stuffolio
- Verify notifications enabled in Stuffolio Settings
- Ensure Do Not Disturb is off
Privacy & Security
Where Your Data Is Stored
| Data Type | Storage Location |
|---|---|
| Products | Your device + iCloud (if enabled) |
| Photos | Your device + iCloud (if enabled) |
| App Settings | Your device only |
| AI Queries | Not stored (processed and discarded) |
What Stuffolio Does NOT Do
- Sell your data to anyone
- Share data with advertisers
- Track your behavior or usage
- Require account creation
- Store your photos on our servers
Security Features
- Encryption in transit — All data sent over HTTPS
- iCloud encryption — Data encrypted at rest
- Biometric support — Face ID / Touch ID for device security
Full privacy policy: https://stuffolio.app/privacy
Back to ContentsGetting Help
In-App Help
Tap the ? icon on any screen for contextual help.
Contact Support
Email: support@stuffolio.app
To send feedback with diagnostics: Go to Settings > About > Send Feedback
Website
Rate the App
If you enjoy Stuffolio: Settings > About > Rate on App Store
Back to Contents